|
I have always had a
fondness for the radical and startling shape of the GeeBee, in some ways it
defys all laws of aerodynamics and just looks like it couldn't fly. But
these planes were built for one thing only, to fly faster than any plane of its
day and win races. They hark back to the golden age of flight when
barnstorming and air races thrilled crowds, and created heros of the racers
themselves. The 'thrill' was certainly the speed but overshadowed by the
danger to the pilots, pushing the envelope to the limit came at a cost.
History
Orginally Granville
Aircraft Corp was established by the eldest of four brothers Zantford (Granny)
Granville and by 1929 having been joined by his brothers Robert, Tom, and
Edward, located to Springfield, Massachusetts. 'Granny' was a remarkable
pioneer in the field of aeronautical development and many patents are attributed
to him, from the introduction of flaps, to coloured smoke dispensers.
With the depression
loaming the Granville Brothers looked to the lucrative arena of air racing and
so the legend was born. In 1930 the GeeBee Model X Sportster flown by
Lowell Bayles came second in the All American Derby, a 5,541 mile race from
Detroit to Texas. Nine of the Model X Sportster's were manufactured, and
following on came the Model Y or Super Sportster of which only two were made.
Money was tight for the Granville Brothers so with donations and
sponsorship deals in August 1931 the Model Z Super Sportster was born.
This was the classic GeeBee airframe, short at only 15 feet long and a round
'barrel' shaped fuselage. But aerodynamically the perfect shape for pylon
racing with the plane on its side most of the time the fuselage body gives lift,
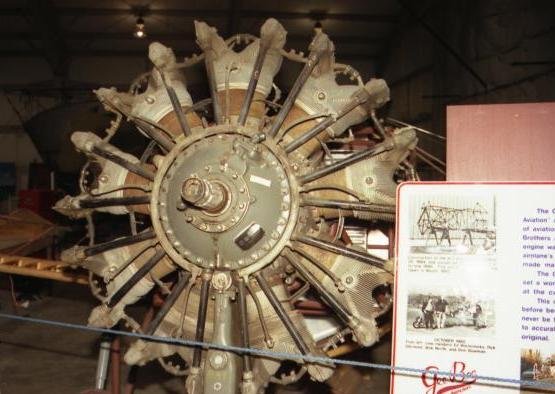
in fact the original lifting body. It was powered by a mighty Pratt &
Whitney Wasp radial giving 535hp, and painted a dazzling yellow and black.
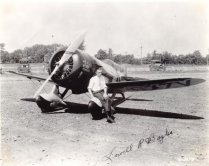
The Model Z was
christened 'City of Springfield' and in the hands of Lowell Bayles broke the
unofficial world speed record of 286mph. It went on to win the Goodyear
Trophy race, the General Tyre & Rubber Trophy and the Thompson Trophy race,
and many others. Now fitted with a larger Pratt & Whitney Wasp 750hp
engine the stage was set for the magic 300mph speed record attempt.
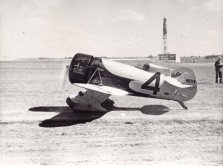
After some
frustrating attempts dogged by mechanical problems, it was Lowell Bayles who on
December 5th 1931 took off from Detroit for the speed record attempt.
Diving down to under 200ft and building up speed Bayles levelled out but shortly
after, the plane pitched up and the GeeBee was sent into a violent
snap roll and ploughed into the ground. The plane exploded on impact and
the 31 year old Bayles was killed instantly. There are many theories as to
why this happened and originally it was thought the filler cap had come loose
and penetrated the canopy hitting Bayles in the face causing the violent
manoeuvre. But after investigating movie footage it seems the right wing
collapsed, this theory is compounded knowing the Model Z was involved the
previous day in a low speed ground accident possibly damaging the right wing.
|
Click on
images below to see larger images
|
|
|
 |

|
So the Granvilles went on to
build the famous GeeBee R1 and R2 but within 5 years the racing scene was over
and with the threat of war loaming the brothers went there seperate ways.
Others would use the GeeBee's in racing but modifying these flying machines
caused erratic flying charactaristics and many crashed.
The Kit
When opening the Williams Bros
kit you are greeted with 2 sprues and a bag of bits. On the whole the
detail is crisp if a little flashy and the engine sprue seemed mis-aligned, but
other than that a nice 5 minute build, I thought....
Assembly started with the
cockpit, and as the cockpit would be closed the detail was kept to a minimum.
You have the option of 2 engines and you need to decide before progressing which
one you want. I decided on the larger Pratt & Whitney Sr which was
used in the final record attempt, so the intake duct under the fuselage needs
cutting and replacing, and the larger cowl option to be used. With the
fuselage assembled I concentrated on detailing the engine, I cut away the mis-aligned
push rods and replaced them with stretched sprue, and added some oil lines.
Just a note that its worth dry fitting the assembled engine into the cowl at
this point, as mine was oversize and I needed to trim the rocker covers to allow
the engine to fit. Only other item added was the cowl catches either side
of the cowl made from offcuts.
|
Click on
images below to see larger images
|
|

|

|

|
The rest of the build was no
problem and I decided to keep the wheel assembly seperate until after final
painting. I opted not to use the monofiliment line supplied for the
rigging and instead used tin/copper wire which sag's less and looks better, if a
little over scale. So all the rigging locations were drilled out and
re-positioned some mis-aligned ones.
Painting
The painting was to give the
biggest headache of the entire build, using tamiya paint throughout a base
colour of white was sprayed first then the yellow was sprayed on. A layer
of future to seal it then came the black scalloping. Unfortunately there
are no decals for this detail, but the instructions come with a 1 to 1 drawing
so photocopies were taken and masks made with tamiya tape. With the black
sprayed and left overnight it was with anticipation I slowly removed the mask,
and fortunately it worked fine. Now if you look closely at the pictures
you will see a red line between the black and yellow, the instructions hint at
using red indian ink but I found this too transparent. I could have gone
through the masking routine again but with such a fine line I thought not.
So in the end I took a deep breath and painted free hand with the smallest brush
I have and although not ideal, to my eyes its 'good enough'. With the
decals added and a layer of future I was ready for final assembly.
The wheels were added and
rigging then a pitot tube fashioned from a donated glue syringe needle.
Conclusion
I loved making this kit and its
certainly one of the most colourful additions to my model shelf, and with
patience (which I lack) it can be made into a fantastic little model. A
few errors made including omitting the Wasp jr decal on the cowl, as mine is
sporting the Wasp sr, ah well live and learn. In fact I enjoyed it so much the
Williams Bros GeeBee R1 has been ordered so stay tuned...........
Happy Modelling
Pete
|
Click on
images below to see larger images
|
|

|

|
|