|
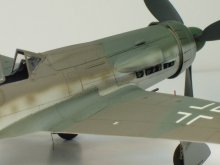
This is the Tri-Master 1/48th scale Ta-152H1, one of the first multi-media,
"hi-tech" kits, this one having several frets of photo-etch, white
metal parts, and metal rod.
I
remember Tri-Master causing quite a sensation in the modeling community when
they started releasing their "hi-tech", multi-media kits in the late
80's. They were ahead of their time, both in the level of detail and price.
Tri-Master kits were expensive! Paying $40 or more for a kit back then was
almost unheard of...at least for me it was. When it came to contests, I remember
cries of "unfair" and howls of protest that these kits shouldn't be
permitted to compete in the Out-of-the-Box category. However, what won out was
the common sense fact that it's not what's in the box, but what the modeler does
with what's in the box. This same kit was later released by Italieri, and if I
recall correctly, DML/Dragon, but with the Tri-Master's white metal parts done
in plastic. I don't know if either of those brands included the PE in their
boxings. This kit has been around for a while, and has been reviewed thoroughly,
so I'll just hit the highlights of my experience with it.
|
Click on
images below to see larger images
|
|
|
|

|
In reviews of Tri-Master's Fw-190 kits, I've read about fit problems, and even
though the Ta-152 has a different fuselage and wings, I half expected it to be
bad fitting too. However construction went very smoothly. Parts breakdown is
very conventional and fit was good all around.
If I have any complaints about the kit at all, it's that the plastic itself was
the most brittle plastic I ever worked with. I learned the hard way right at the
start that nippers or cutting pliers could not be used to remove parts from the
sprues. Every part I removed that way cracked or broke. Everything had to be cut
from the sprues using a razor saw.
Many of my models have a humorous or disastrous story about something that
happened during construction, and this kit is one of those. Remember I said how
brittle the plastic was? Well, add to that the fact that the one-piece lower
wing was warped pretty badly and you have a disaster in the making.
Understanding this, I was very carefully trying to bend it back into shape,
using hot water and a hair dryer to soften the plastic. While in the middle of
this process, one of the guys came over. He commented that if I wanted to get
that wing back into shape, I'd have to bend it more than I was doing. I told him
about the brittle plastic, and he said, "ahhhh, watch, I'll show you how to
do it". He took the wing from me and started bending it. I said, "Hey,
careful, you're gonna....." Yup, you guessed it...S-N-A-P!!!!! The wing
broke.
> FORTUNATELY, he had the Italieri kit and brought me his wing.
UNFORTUNATELY, he didn't have the wing spar that attaches to the bottom wing and
runs through the back of the landing gear wells. FORTUNATELY, I had the one from
my broken wing. UNFORTUNATELY, I'd already glued it into the broken wing (before
it broke). FORTUNATELY, I was able to remove most of it intact. UNFORTUNATELY,
the key word in the last sentence is "MOST", meaning some of it broke
(remember I said how brittle the plastic was?).> FORTUNATELY, included
in my menu of kit assembler skills is the ability to form rudimentary parts with
sheet plastic, which I used to fix the broken wing spar, and finally,
FORTUNATELY, my replacement wing wasn't warped.
So, with
the wing disaster out of the way, construction proceeded normally with no
serious fit problems. The kit comes with a pretty complete engine and the option
to open up the cowling, but even if you choose not to open up the doors, you
should build, paint and install the engine since it will be visible through the
landing gear wells. I chose to leave my cowling buttoned up since I love the
lines of the long-nosed FWs and, quite honestly, because I couldn't get the
@#$!{}*&^%@ photo etch hinges together correctly. A stroke of luck though,
my shortcoming in making photo etch hinges displayed itself before I cut the
cowling, so all I lost was one evening messing with the hinges and another
making the fully detailed engine fit inside the closed engine cowlings.
|
Click on
images below to see larger images
|
|
|

|
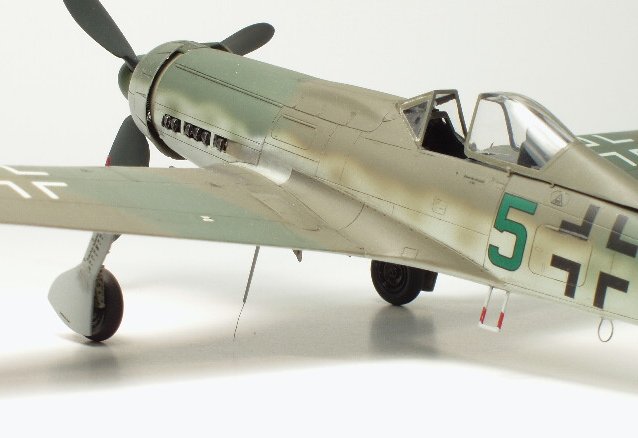
Now, onto
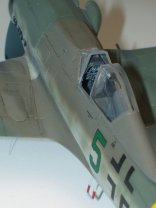
painting and one of the reasons I hate to do research; conflicting information.
The kit instructions show RLM 76 on the bottom and sides, with RLM 81 & 82
on the top of the fuselage and mottling on the side of the fuselage, and RLM 75
& 82 on top of the wing. However, I remembered that the instructions in the
Aoshima Ta-152 recommended RLM 81 & 82 on the wings. I did a little bit of
additional research and found sources that claimed both; 81/82 on the wings, and
75/82. I 'm sure some of the accuracy police out there are yelling at
their monitor right now, " Dude, it should be 82-83 " , and some
others are yelling, " I 'd have gone with 75-82 ". What to
do, what to do? Well, not being one to let conflicting research or issues of
accuracy hold up a project, I painted it the way I wanted to; 81 & 82 on the
wings and fuselage. I used Model Master paints shot through my Badger 150.
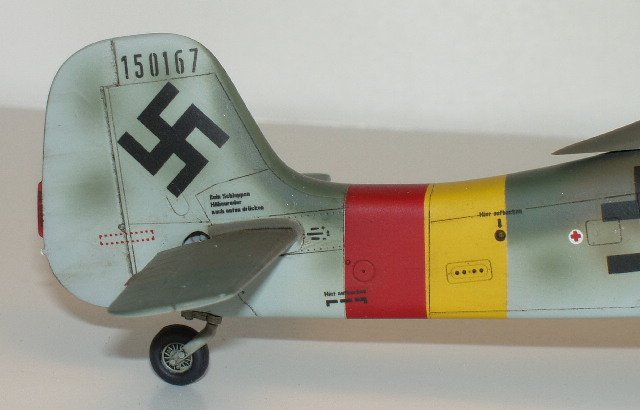
Several
coats of Testors Glosscote, and the kit was ready for decals. I used the kit
decals, which are typical of those from the mainstream Japanese model
manufacturers; well printed, but slightly thick. They reacted well to the
standard decal solvents, and once settled down and dry, looked good. I hit the
model with another coat of Glosscote, followed by a wash of turpenoid-thinned
oil paint, then a final coat of Testors Dullcote.
Overall, this was an
enjoyable project. It went fairly quickly, and other than the brittle plastic
and wing disaster, didn't give me any problems. I'm now looking forward to doing
Tri-Master's Fw190D-9 to see if it fits as badly as everyone says.
Chip
|
Click on
images below to see larger images
|
|

|

|
|
|