|
Hello, fellow
modelers and readers!
I've always liked
Mirages because the Venezuelan Air Force has had several Mirage III and Mirage 5
squadrons. The Mirage 2000 is the last of the family and is used by various
countries. As soon as Italeri released its two-seater version I bought it
because it's the only two-seater Mirage kit I think exists in 1:72.
The kit
The kit has recessed
panel lines overall but on the ventral fuel tank, the pylons and the instrument
consoles. The quality of the model is good, it nevertheless has some mistakes
such as the inclusion of under-fuselage cannons (absent in all two-seater
versions,) the position and angle of the radome line over the nose, and the
presence of rib lines on the ventral fuel tank, which appears seamless in
photographs.
Other details arise
from the differences between two-seater Mirage 2000 from different countries.
Although the model is identified on the box as a Mirage 2000D, this correspond
only to the two French aircraft represented in the decals, the Greek version is
a Mirage 2000BG and the Taiwanese a Mirage 2000-5. Kit's instructions only
differ in painting and markings, but photos from the Internet (look for them at
Airliners.net) show notable differences of external stores from each version,
which should be indicated in the assembly instructions.
There are some more
detailed reviews of this model on the Internet. With some minor corrections and
actualisations on the pieces, the instructions and the decals, Italeri would
offer a renewed and better kit.
Click on
images below to see larger images
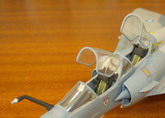
Cockpit painting
and assembling
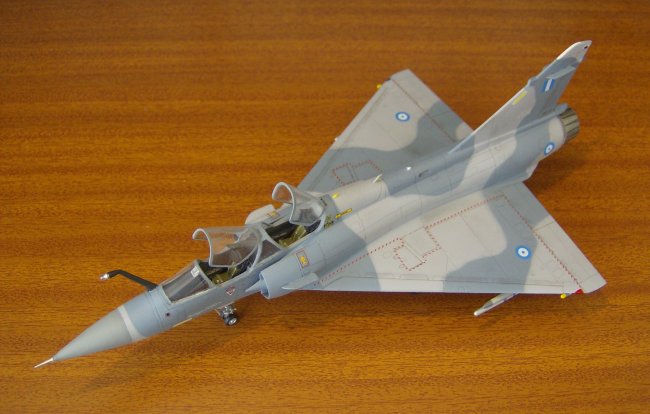
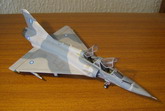
Before starting
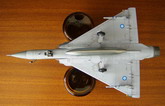
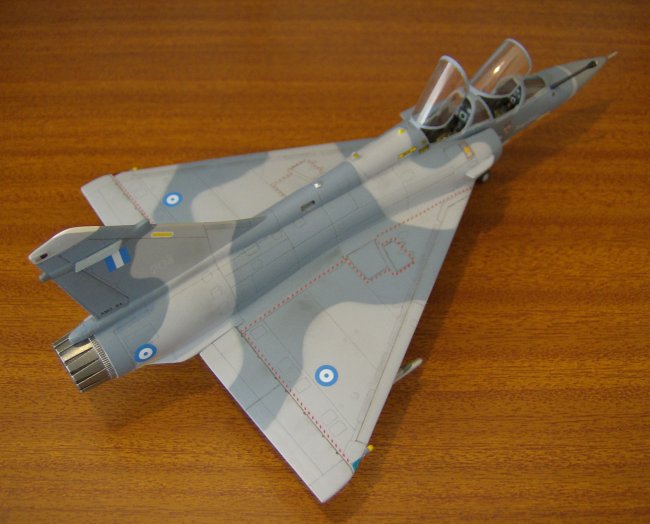
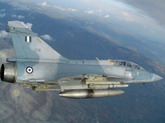
assembly I chose, from the four kit's options, the Greek Mirage 2000BG with its
attractive blue and light grey camouflage similar to that of the French
one-seaters. In October 2007 I downloaded an in-flight photograph of the
aircraft I was going to model, the one with the serial "204" (see
below) along with photos of other Greek two-seaters and one-seaters.
I also looked for
photos of the cockpit, soon I realised that the kit's consoles do not correspond
to the earlier Mirage 2000 with analog instruments nor to the more recent
(Mirage 2000-5) with multi-function screens. I used the photo only to decide
what color to use, FS36231 Dark gull grey.
After having seen in
the Internet photos of instrument panels from many different aircraft, I decided
from now on not to follow instructions that suggest painting the dials on
white (or silver) over a dark background. No real aircraft has white dials, and
though painting them white helps to show them better, the result is completely
unreal because the dials of an aircraft don't have to be seen from afar (in
fact, I can see my car's dials only when sitting in front of the steering wheel
and with the switch on.)
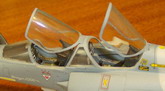
I therefore painted
the dials gloss black with their bezels in light grey. I painted the radar
screen with green, the placards grouping several instruments with medium grey,
and the seats with black racks and olive green cushions. I also added
masking-tape belts to the seats and painted with Tamiya matt aluminum the
underside of the cockpit floor, which is the front wheel's well, along with the
front undercarriage doors, which were molded on each fuselage side. After
painting all the cockpit parts, I assembled the cockpit and glued it into the
starboard fuselage.
General
assembling
Before joining the
fuselage halves, I epoxy-glued some lead shot inside the nose. I then polished
the canopy pieces, later I masked and glued them to the fuselage, retouching all
the joints with putty and white glue. After this I painted the inner side of the
intakes' pieces, along with the fuselage zone of each side that was going to be
partially covered by each intake and the planar section at the rear of the
intakes' openings. Later I then assembled the wings and the intakes, and then I
glued them to the fuselage.
It was necessary to
fill and sand some of the joints. It was also necessary to fill the depressions
for the two under-fuselage cannons because these shouldn't be used, for this I
glued half-cylinder sections I cut from spare rockets left from other aircraft,
and later I filled and sanded the joints. As the “204” only carries armament
under its external pylons, the slots for the inner pylons also were filled and
sanded, later the lines that passed over the slots were re-scribed. I carried on
with the assembly following the kit's instructions except on the steps related
to the landing gear and the external stores.
General painting
There are subtle
differences in the colors used in Greek and French Mirages. The blue on Greek
Mirages looks a little darker, the Greek Mirages seem to have a matt finish
while the French ones have a satin finish. Moreover, French aircraft look
cleaner. I used photos as references because kit’s instructions have mistakes:
as an example, they suggest a lighter shade of grey (FS36375) for the radome
than for the remainder of the fuselage (FS36230,) but the photos show that the
radome is darker than the fuselage.
Since it’s easier
to mask the radome than to mask the nose around the radome due to the conical
shape of the nose, painting should begin at the radome. Nevertheless, the
kit’s radome line is incorrect, so I covered it with super glue and later I
scribed a new one, this process was more difficult than I expected. Then I
painted the radome with FS36270 neutral grey, later I masked the radome and
after that I designed and cut semi-translucent paper masks for the remainder of
the aircraft. By the way, the camouflage pattern suggested by the instructions
is incorrect in some places, so it’s a good idea to check other references.
I saved the masks
and then I painted the aircraft FS36375 Light ghost grey. Later I painted a coat
of gloss clear and then I applied the masks with Blue Tac stripes to leave a 1
mm separation above the surface, in order to get a semi-hard color transition.
The instructions suggest using FS35164 Intermediate blue for the camouflage but
this blue is too dark, so I mixed it with white, after some trials I found the
desired shade with a 2:1 proportion.
I carefully painted
the pylons for the external missiles using my photographs as references. In
first place, their grey has a yellowish shade, so I mixed three parts Humbrol
Authentic HB4 Sea grey medium with one part HU103 Cream. In second place, the
ends of the pylons show dark grey areas. The shape of the dark area for the rear
end seemed difficult to paint, so I built Scotch magic tape masks based on
measurements I made over the in-flight photo. I painted the pylons' dark
areas with HU106 Ocean grey, the same grey was used to paint the ends of the
fin’s passive warning receiver and part of the cylindrical sensors located
near the wings extremes. I painted the rounded ends of these sensors with pale
yellow.
There is also a
white curved antenna panel just on the front end of the fin, to paint it I made
two Scotch magic tape masks (one for each side.) After painting this panel I
applied two gloss acrylic clear coats and the model was ready for decal
application. By the way, I also used in this model the method for designing
symmetrical masks that I've described in past articles.
Decaling
Italeri’s decals
for the Greek versión have some mistakes: the blue from the insignias should be
darker, the “204” serial numbers should be black instead of light grey, and
the fin 's squadron insignias are missing (though these appear partially erased
in photos.) Regarding those decals that are common to all versions, the
formation lights should be light yellow-green (like British “sky” color) and
should have no border, instead of being yellow with a white border, a pair of
ejection warning signs for the rear seats are missing, and the red wingwalk
areas are too wide. Moreover, the sign “Mirage 2000” over the fin isn’t
common to all versions, it should read “Mirage 2000BG” for the Greek
version.
Since it’s
difficult to find decals for the Greek versión, even more in Venezuela, I
decided to use the kit’s decals with their mistakes. I would have painted the
formation lights if Italeri would have scribed the contour of all of them, but
the ones of the fin and of the fuselage starboard are missing, so I covered the
existing contours with the decals (in fact, the decals are bigger than the
contours.) In relation to the red walkways, I cut them at the middle of their
width, this made their application more difficult, specially in the case of
those that go next to the airbrakes.
Weathering
The Mirages
2000 from the Hellenic Air Force show some dirt on the fuselage sides, on the
fin, at the point and the border of the radome and under the fuselage just
behind the main undercarriage doors, as it can be viewed in Internet photos of
the “204” and other Greek aircraft. An odd aspect of the “204” is that
the red warning triangles look very faded in photos. I didn’t try to reproduce
this feature, leaving these triangles untouched. Mi weathering was restricted to
the application of some dirt and subtle panel line accents (panel lines are
hardly visible in photos of modern jets.)
I applied a
sepia-ink wash for accenting the control surfaces and the airbrakes just before
applying a matt clear coat. After applying it, I used a very sharpened “F”
graphite drawing pencil to accent the panel lines, and powdered graphite to
simulate dirt, applied with a small brush and diffuminated with cotton buds.
Then I applied another matt clear coat to seal the graphite.
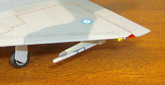
Finishing
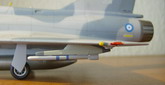
Finishing included
the assembly, painting and gluing of the landing gear, the missiles and the
ventral fuel tank, and the painting of some little details. Since the kit
didn’t include Magic 2 missiles, which is the only armament of “204,” I
decided to scratchbuild them. Measuring over the inflight photo and computing
proportions, I found that the diameter of Magic 2 missiles is almost the same as
that of British WW2 aircraft rockets, so I modified a pair of these rockets
(leftovers from old kits.) I painted the missiles with Light ghost grey along
with the rest of the aircraft, since the missiles are inert, I masked and
painted the corresponding blue bands with a mix of Humbrol 14 and 48 blues,
using the photos for referencing the location and the width of the bands. I then
applied a matt clear coat to get an even finish and finally I painted the
missiles’ heads with Tamiya matt aluminum. I would have achieved better
results if I would have replaced the rockets' fins, which were too thick.
Regarding the
undercarriage, I had already painted the main gear doors’ external surfaces
with Light ghost grey along with the airframe. I masked the area adjacent to
each wheel well and later I painted the wheel wells with matt aluminum along
with the doors’ inner surfaces. I carefully assembled the undercarriage legs
and then painted them with Revell Steel, which gave an excellent contrast with
the Chrome silver of the oleo portions and the landing lights of the front leg.
Although the instructions indicate silver for all the wheel’s hubs, in the
photo of “204” on the ground (see below) the main wheels' hubs appear
dark with a silver border, so I painted them with HU106 ocean grey and matt
aluminum.
Other finishing
touchs were: construction, gluing and painting of the black blade antenna that
goes just before the front landing gear, construction, gluing and painting of
the dorsal antenna that goes just behind the rear cockpit, gluing and painting
the refuelling probe, painting of the fin’s lights with metallic black HU201
and chrome silver, painting of the navigation lights and finally painting the
pitot tube, which was also shortened according to measurements taken over the
photos. The dorsal antenna was painted yellow with three borders in Light ghost
grey, for the yellow I tried to match the best that I could the deep yellow of
the Rescue arrows that go next to the cockpit.
It’s pertinent to
mention that the refuelling probe wasn’t present in the photo of the “204”
I downloaded in 2007, so the probe wasn’t in my initial construction plans.
Nevertheless, the probe appeared in the two photos I got at the beginning of
2009, so I finally added it. It was necessary a lot of sanding at the bottom of
the probe to get a good fit over the curved surface in front of the windshield.
The probe was hand painted with my “scale black” mix (four parts HU33 Black
plus one part HU67 Tank grey,) and using Tamiya matt aluminum and HU53 gunmetal
for the metallic piece.
Another difference
between the 2007 and the 2009 photographs is the position of the dorsal antenna.
I nevertheless glued it in the original position to avoid the sanding, masking
and painting that would be needed to hide the mark I had previously done to
indicate its location on the spine.
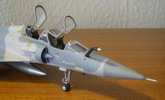
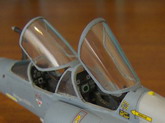
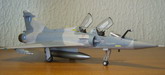
Once I did all of
the above, I took off the masking from the canopies and found two disappointing
surprises: first, there were some residues inside the cockpit clearly visible
through the canopy, second, the paint lifted from the canopy frames in several
places. I had to remove the canopies to take out the residues, later I repainted
the frames. Since anyway there was a gap between the front canopy and the
windshield, and the rear canopy sat higher than the rest, I decided to glue the
canopies in the open position, which on one hand made the fit problems disappear
and on the other hand gave another life to the finished model.
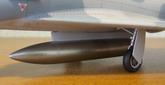
The very last bit
was the ventral fuel tank, which should have a somewhat dark natural metal
finish. Since the fuel tank and its pylon were integrated in the kit, the fuel
tank was first polished and masked, after this the pylon was painted with Light
ghost grey, later the pylon was masked and the tank was painted with a mix of
Humbrol Metalcote Polished Aluminum and Polished Steel in 4:1 proportion. The
fit between the tank and the fuselage wasn’t good, I should have checked the
fit before painting the fuel tank to ease the correction of this problem.
Well, after more
than two years of working with many interruptions and more than one problem
I’m quite happy with the results, just in time to celebrate my 50th birthday.
This was a strange case in which the reference (better said, the real aircraft)
changed without previous notice during the model’s construction.
Fortunately the change was for good viewed from my perspective, because I like
the model with the refuelling probe more than the model without it.
Thanks for watching
and your patient reading.
Greetings from Caracas, Venezuela.
NOTA:
Para recibir este texto en español, envíeme un e-mail pidiéndolo.
Orlando Sucre Rosales
Click on
images below to see larger images
|