|

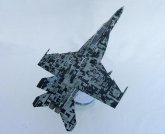
The first and most important thing right away: A big THANK YOU to Robert Dubonette! Without your help, patience and references I wouldn’t have been able to pull this off. There are decals and markings for all possible kinds of CONA birds except the elusive Blue Rhino but it was exactly this bird that just fascinated me so darned much that I just had to give it a try and do it myself.
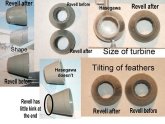
I used the RoG kit (the one with the red VFA-102 anniversary camo). The kit is very nice and you get a lot of model for your money. Nonetheless it had to go through quite a pile of alterations and scratchwork. I haven't used any resin, either because it wasn't available at the time I started building or I was just too thrifty to spend silly money on extras. I completely reworked the engines, i.e altered the
overall shape, adjusted the tilting of the nozzles, scratchworked bigger, deeper and hopefully more authentic turbines and added extra stretchers inside. Especially
"full body make ups" such as this digi camo require dimensions from the kit that are as close to the original as possible, as you run danger to hit some real problems adjusting all the details once something doesn’t quite match up at one point. As for Revell, the LEX’s are somewhat too thick and too short but that is actually a quite easy fix.
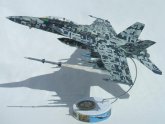
165677 had at least in my eyes a rather unusual configuration, i.e. a pre-ACS-cockpit but already the newer Bart stacks installed between the fins. I know there are resin parts out there but since I was scratching other things on that kit anyways I just thought go all the way and do that too. Revells and Hases cockpit frames are both not quite right. The original Foxtrott features a slight step between the border on the windshield and the one on the canopy. Since Revell’s dimensions are roughly equal the fix via some putty is a rather easy one. Further changes were less substantial like erasing the ALE-50 launcher on the belly, adding some detail to the LAUs, alter some grids, vents and detailing some tubes and probes on the fins. Eventually the canopy received some scratch extras like mirrors and handles and the pit tub got some extra wires and cables.
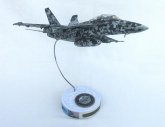
As VFA-122 crews are often members of fleet squadrons with their own equipment I went for reasons of neutrality with black white HGU-55/-68 helmets without extra markings and visors and turned them dirty and used off. Both crew members got a little CONA patch on their shoulders. Why and what the WSO is photographing has to stay a secret for a little while longer till you further scroll down.
|
Click on
images below to see larger images
|
|
|
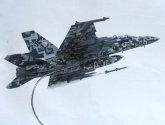
What might be visible under the flash light, is that rainbow effect that Hornet-cockpits among others currently feature as well as the slight tinting of the windshield. Controls, panels
and displays received some extra scratch detailing along some lid up displays to make the cockpit look a little more alive. The HUD is scratch as well. Little things like replacing the position lights with clear plastic gives a little more life to the model. The little mount to fix the pylons on stations 2 and 10 are missing in the Revell and also in the Hase kit and need to be scratched if you want to present a Hornet without these pylons. The pylons on stations 3 and 9 received some further detailing and rework.
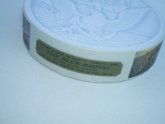
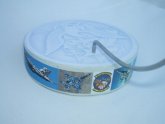
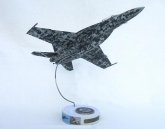
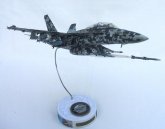
For lack of better ideas for the display stand I printed a faded bluish NAVY logo as some sort of background for the CONA medal. And since some
non-insiders just don’t want to believe me that this baby flies for real I added some small shots of the original from every side and angle to the display so you got a little comparison or reference – whatever – just turns the whole thing a little less boring. O.k., so why and what does the WSO photograph?
Actually it is more authentic to depict this particular Hornet without any ordnance and one should be careful to not optically overload a model with such a sick
camo, but let’s be honest, if you put a model onto the shelf you want it
to look bad ass and though the real deal might look nasty even without a load this 1/48 fella looks a little blank after all. I still couldn’t decide which road to go – rather authentic or
"Yeeeeyyyy!" and so I just chose the flexible way of using magnets after the kind heads up of a fellow
modeller. This way I can choose just whatever way I like at a time – realistic or
"woooaaahhh". I stuck with blue inert amo since live rounds really WOULD have looked inappropriate and since we are talking about the “Blue Rhino” we just stay consequent with the load as well.
So why and what is the WSO photographing? Well … since I do like to present my jets “in action” I just thought why the hey not go all the way and ……
Klick Klick Klick - Gotcha!!!!

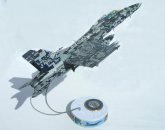
Well there are certainly little discrepancies but basically everything fits way better than expected. All panel lines meet the right cubes and squares in about the right angle just as on the original and also the right cubes are roughly on the respective vents, grids and access panels just like on the real one. At least I am quite o.k. with how "she" came out or let’s say it this way – I just don’t know what and where to still make changes.
The direct sun light produces nasty shadows but this way the clear CONA writing stands out from the flat surface and one can see the rainbow effect on the canopy. I don’t know if it is visible but I tried to imitate the different consistencies of the colors applied on the original. They used flat and semi flat colors on the big one as well as it seems, which kind of gives the surface some effect as if it would be “alive” under direct light.
Hope you enjoyed the little "Fashion Show" and what do we learn? ... Don't be afraid of complicated camos - They can be done!
Alexander
Breunig
|
Click on
images below to see larger images
|
|
|
|
|
|