|
After finishing my Trumpeter
HH65A, I needed an easy project. During a recent business trip, I picked up the
Hobbycraft Hurricane MKIIC for $12.00. I figured, for the price, I'd just build
it (funny how we have this illusion when we start a kit and before AMS kicks
in). When I took a closer look at the kit, I found that the it is not bad at
all, when compared to Richard Caruana's drawings in Scale Aircraft Monthly (Vol
1, issue 5), and some reference photo's I found on the net. The only problems,
other than a few slightly misplaced, or missing panel lines, is that the angle
of the outer wing section is a little too sharp. The cockpit is a little sparse,
but you can't really see inside to tell anyway, and the instrument panel is
fine. The real area that needed work was the wheel wells.
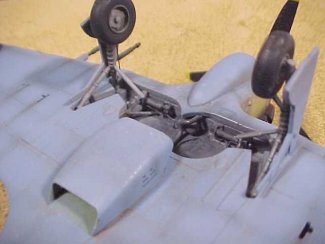
So, what to do without adding
huge cost to project? Add some wire and plastic to the cockpit to improve it and
do the same for the wheel wells. So with this plan in mind I began building. The
last Hobbycraft kit I built was a Vampire, and I was not impressed, so I wasn't
sure what to expect from the Hurricane. What a surprise, the fit of most of the
parts was excellent. For the cockpit I improved the floorboards and added rudder
pedals, seat adjustment and canopy jettison handles and wiring. I shaved the
seat back as it seemed too high to me, and added seat belts from paper with
reheat buckles. I also thinned the overly thick amour plate behind the pilots
head. This was all painted Model Master RAF interior green, detailed, and
weathered with an oil wash and silver pencil.
Whatever detail (or lack of)
there was in the wheel wells was removed. This was replaced with a new air
bottle, retraction cylinders, piping, braces, cross members etc, painted
aluminum, given a wash and then masked with wet tissue and Tamiya tape. The
shell ejector chutes were missing from the wings, so these were added, as were
the missing panel lines. I found the missing panel lines to be somewhat amusing.
There were lines that were on the upper half of the wing going around the
leading edge, but were missing on the lower half. There were also some on the
left side that were not on the right. I guess the molds were made on a Monday.
The navigation lights were cut out of the wing and the resulting gap in the wing
was filled with putty, sanded and painted interior green. A piece of aluminum
tubing with a blob of glue on the end (painted the appropriate color) was used
to make the light. The whole area was then built up by applying layers of CA and
accelerator and then polished. The result was pretty good, although I did get
some small air bubbles in it. The lumps that represented the landing lights were
drilled out and replaced with MV lenses. The clear covers were then installed,
sanded to fit flush with the wing and polished. These area were then masked. The
rest of the kit went together without any trouble.
|
Click on
images below to see larger images
|
|

|
 |
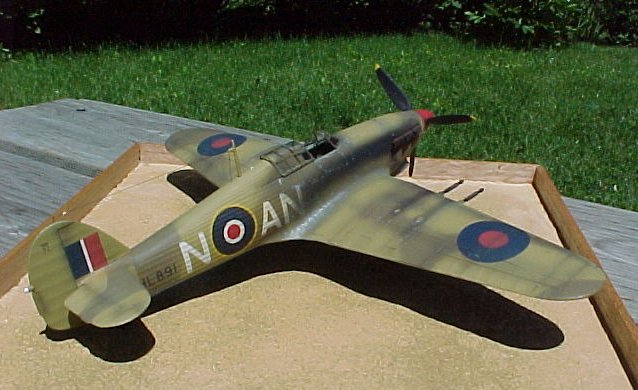
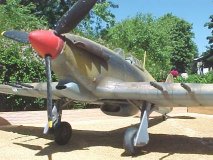
Next, it was off to
the paint booth. My references showed that Hurricanes in North Africa took a
pretty good beating, so this aircraft would need to be weathered a fair amount.
This was my first attempt at pre shading. All the panel lines were painted Gunze
flat black. Once that had thoroughly dried, I applied a coat of Model Master
Azure Blue to the undersurface. This was masked and the Mid Stone applied. The
camouflage was then masked using rolled Blu-Tak and paper and the Dark Earth
sprayed. I then tried my first attempt at post shading. I let this all dry for a
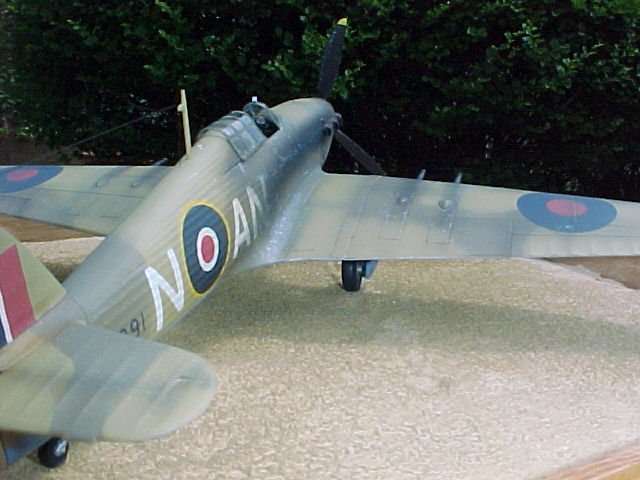
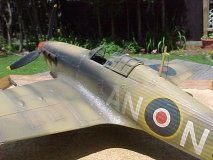
few days and shot a couple of coats of Future. The decals are a combination of
the ones from the kit, and Flightdecs. The
kit decals are for 417 "City of Windsor" squadron RCAF, in Libya, 1943
and in general are not bad. However, the wing roundels were out of register and
no stenciling was provided. I therefore picked up Flightdecs set "Canadian
Hurricanes". The flightdecs decals were great. The only trouble was that
they are so thin that some of the stencils folded up while trying to get them
off the backing paper. Luckily the set includes complete sets for three
aircraft, so I had plenty of stencils. A final coat of Future was sprayed, and
once completely dry, I applied an oil wash of darkened burnt sienna. Then I
started beating it up. The upper surfaces were first spayed with thinned and
lightened mid stone. Then a few light coats of Pollyscale dust to fade them a
bit more, followed by a coat of Polly S dull coat. The Exhausts were drilled out
and painted with a mix of Testors steel, black and rust. The exhaust staining
was built up with very thin Gunze flat black. The cannons were then drilled out
and attached. A silver pencil was used for the paint chipping. Brake lines were
added to the landing gear, while the gear doors had panel lines and rivet detail
added to the interior. I did some detail weathering with pastel chalks and
applied a final layer of dull coat. I added a Squadron Vac canopy, which,
although designed for the Hasegawa kit, fit fine. This was also my first use of
a vac canopy and I almost went nuts trying to first cut it out and then mask it,
as the framing is very light. I think the effort was worth it though.
Was this the quick easy build I
was originally looking for? Not really. But there were no problems with building
this kit. The fit was very good with only minor amounts of filler required. The
extra work was all to improve detail and was by choice, not necessity. Hasegawa
it isn't, but if you look at it as "bang for the buck", I got a model
that looks like a Hurricane, didn't make me swear (much), that I am very happy
with, for a small investment. Could I have done more? Yes, the flaps, elevators,
and rudder could have been animated, but I was looking for a quick build. Maybe
next time. Thanks goes to the ARC discussion board crowd for putting up with my
Hurricane questions and giving the answers I needed.
Lloyd
|
Click on
images below to see larger images
|
|

|
|
|
|
|