|
Both
kits are the Hasegawa rendition of FW190s and as such construction is quite
similar as many parts are common. These kits have been around for some years
now, but they still are amongst the best. Their panel lines are very finally
engraved and shapes seem to be accurate. One point that can be improved is the
cockpit area. But that's quite a Hasegawa trademark, at least in the smaller
1/72nd scale, even on more recent models.
|
Click on
images below to see larger images
|
|

|

|

|
Construction
Construction
is quite straightforward on both models. Wings have been quickly assembled. I
had made the effort of altering main wheel well on a previous Hasegawa FW190
model I built. It is well known that there is no wall between the right and left
wheel wells on real FW190s. Therefore quite a simple surgery should be done if a
model is built for a contest with the seek of accuracy in mind. I decided
otherwise and left my models as is this time considering that this should not be
too visible (not entirely true given the high stance of FW190s).
What
I could not leave untouched is the cockpit area. I love to detail my small
cockpits. I used a True Details cockpit on the FW190D and an Aires resin set for
the A. Dark grey RLM66 overall, white, red or yellow dots on details, red brown
cushion for the seats, light khaki on seatbelts, a slight light grey dry
brushing to enhance details and my tiny cockpit tubs could be cemented in place
and half fuselages cemented together.
The
kits also differ in details treatment. A photo-etched part is used as instrument
coaming (Aires) in front of the pilot on the D, whereas fuselage decking behind
pilot is another photo-etched part (Airwaves) on the A.
That
is time then for main assembly with wings and stabilators being attached to the
fuselage. An Overall sanding with increasingly fine grain (to 3600 Micromesh)
was accomplished to prepare surfaces before painting then I added small details
like antennas and retracting boarding step (photo-etched parts used), tiny wheel
position indicators (made from stretched sprue), transparent parts etc...
Painting and
decaling
Both
my planes depict 190s during the last stages of the Second World War. I wanted a
colourful machine and an unusual one.
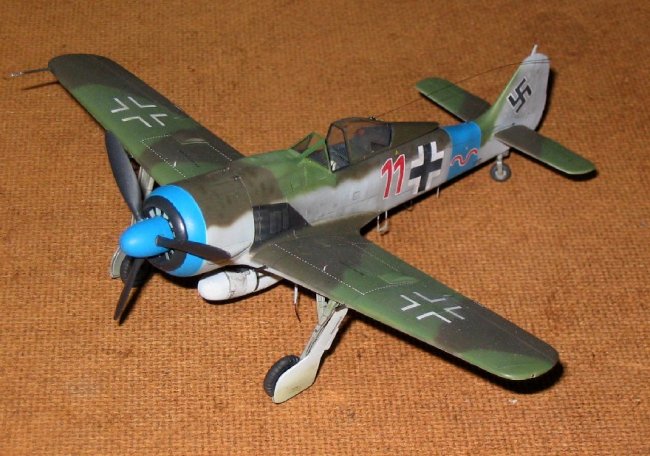
The
FW190 A is the colourful one. Camo colours are the quite common RLM81/82/76
scheme with bright blue Engine ring, propeller cone and fuselage band. Most
colours are Gunze, blue is from the Tamiya range.
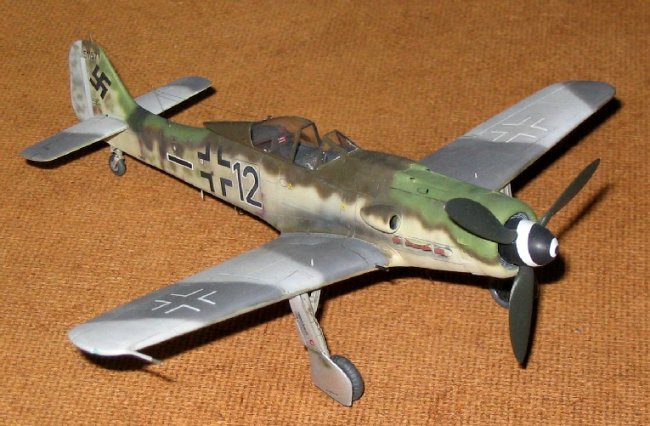
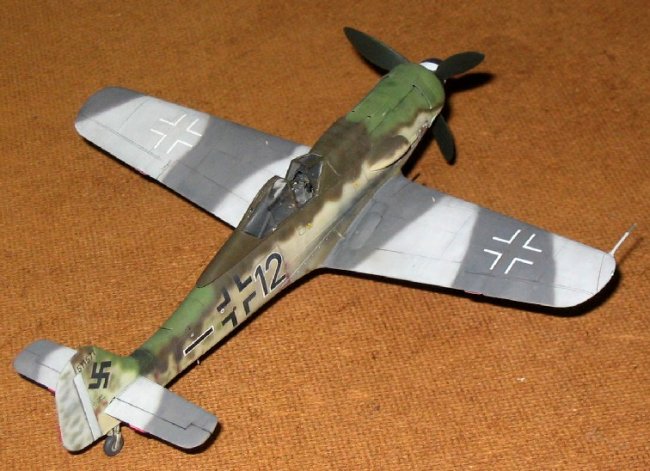
The
FW190 D is the unusual one. I choose to build it as black 12. It is quite well
documented as at least one colour photo of this aircraft exists. But it has been
interpreted in different ways. I found additional information on this aircraft
after I completed my model so it might not be perfectly accurate. General
agreement is that the aircraft has a RLM81/82/84 fuselage with RLM76 fin,
RLM75/77 upper wing surfaces. Wings and fuselage under surfaces are partly RLM84
and partly left unpainted metal. Small spots of red brown anti rust paint are
spread around fuselage and lower wing surfaces. That is over 8 colours just for
external surfaces! Paints are Gunze again except silver which is enamel.
Both
models are given the weathering treatment. Very light spots of the altered main
surrounding colour and a wash of dark brown in the panel lines.
|
Click on
images below to see larger images
|
|

|

|
I
also altered my varnishing technique on these models. Until quite recently I
used to spray my model with overall layers of gloss, then matt clear varnish in
the usual gloss-decal-flat process. I later found out that doing so, 50% of my
weathering effects were lost.
It
recently came to me that varnishing should be taken as part of the painting
process. I therefore applied my varnish as lightly as I would for paint. Some
parts even were left unvarnished. Varnishing therefore becomes part of the
painting and weathering process and I believe the end result is highly improved
by this new approach.
Apologies
: I noticed radio antenna was broken on FW190 A only after photos were shot.
Eric
|
Click on
images below to see larger images
|
|

|

|
|