|
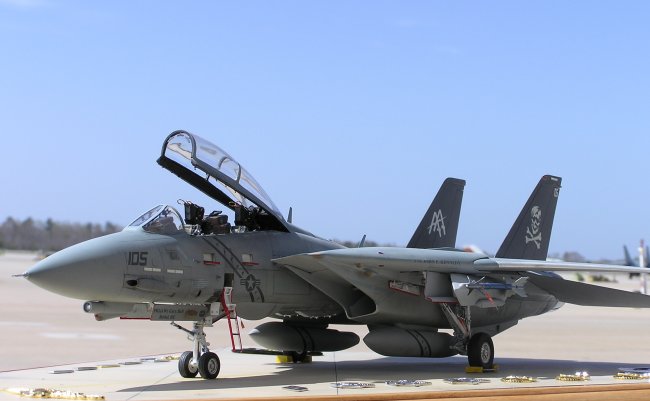
This is my 1/32
F-14B done up in my squadron's colors. I started with the Tamiya
"Black Knights" kit. I can honestly say they didn't do to much more
work with it than the 1994 version, as this thing was a bear to build. The
forward panel lines were all recessed as they should be, but the aft ones were
still all raised. In addition to re-scribing all of the panel lines (why do I do
these things to myself!), I also sanded flat some of the raised panels on the
forward end that looked more like armor plating than panels.
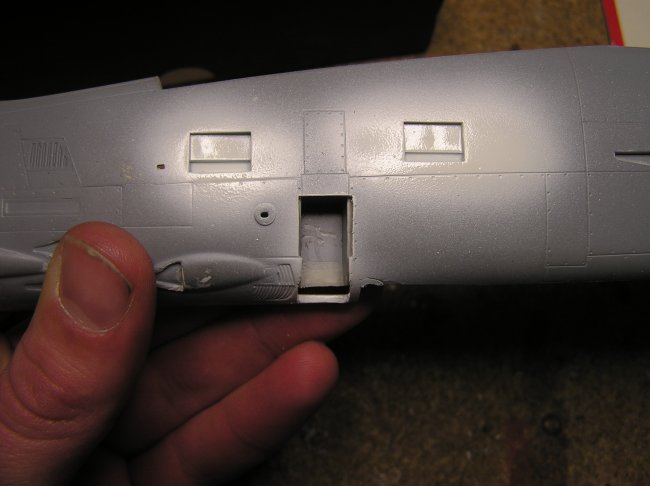
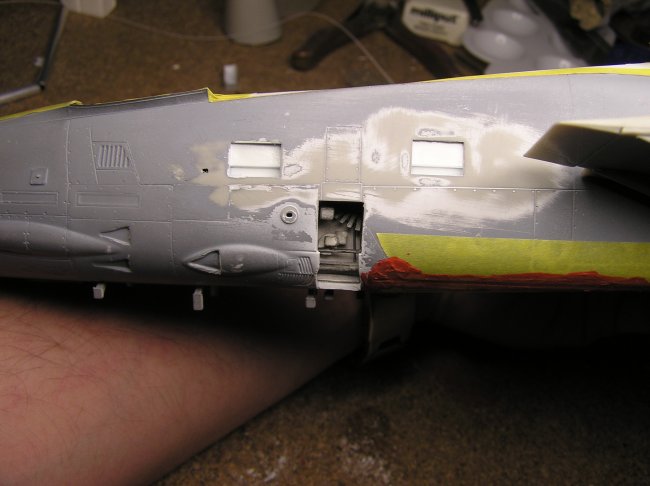
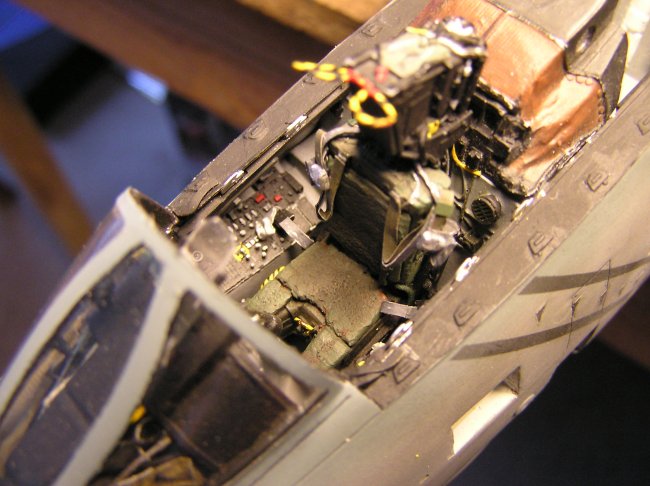
Next came the ladder well area. SERIOUSLY lacking in detail. It is a hollow box
for pete sake! "That won't do" I said to myself (I think my voice of
reason was out doing something else at the moment). So out comes the kit ladder
area, along with the door just below the boarding ladder. You will almost never
see a ladder down on a Tomcat without the access door to the canopy open/close
handle open as well. Using some
sheet styrene, some wire, miliput and quite a bit of patience, I scratch built a
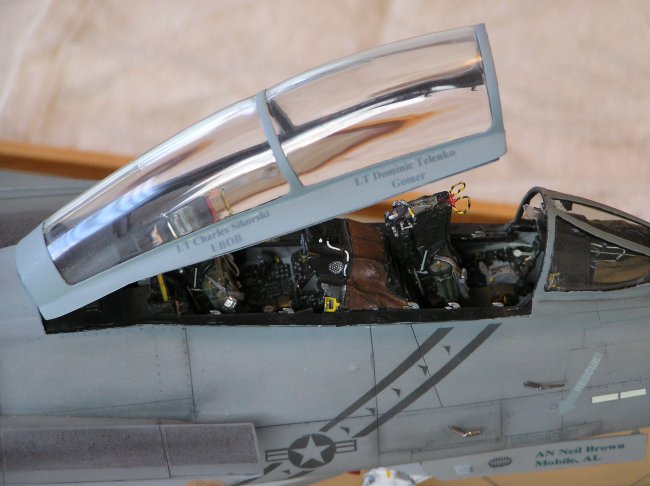
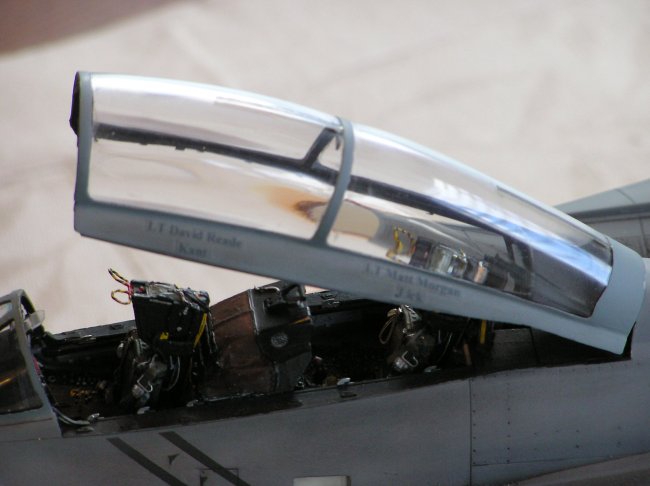
new ladder area, and I must say mine looked better.  Once that was done, I got to work on the cockpit. Seeing as a large part of my
actual job is in the office of these beasts, I saw
Once that was done, I got to work on the cockpit. Seeing as a large part of my
actual job is in the office of these beasts, I saw
a lot of short comings in the Teknics kit. The largest being the pilot's
instrument hood. The kit says F-14B cockpit set, but the shroud and HUD are
still that of an F-14A. Reaching for the trusty Miliput and Exacto blade... I
set out on my journey. First I removed the canvas covers to either side of the
centerline. In the "B", the canvas covers are in two pieces, one on
either side. The "A" had a single cover covering both
sides and going across the center. once the side wells were cut out, I filled in
the center and the hole for the "A" HUD with the miliput and let it
dry. From there, I reshaped the top, and removed the control panel in the front.
This was replaced with a different panel in the jet and mainly only had a turn
coordinater on it. Finally I scratch built a new hud using plain and clear sheet
styrene, added the wiring on the shroud, and used painted toilet paper for the
canvas. When the TP was dried, I cut it to shape, soaked it in water to make it
more pliable, and then put it in place. Fun huh?
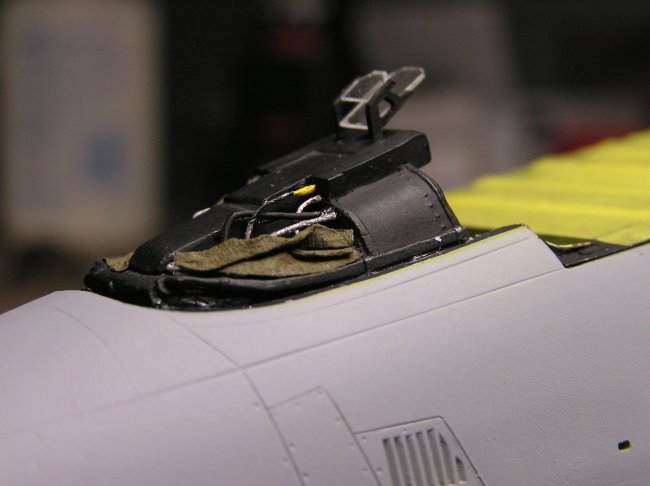
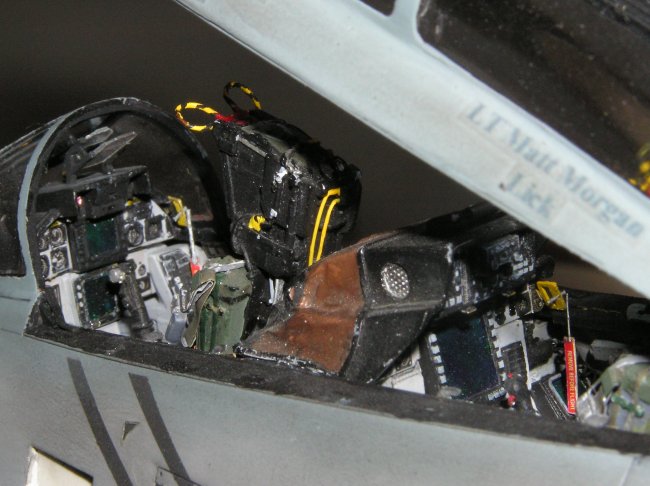
Off we go to the seats. The
detail in the resin seats is amazing, but again.. there are a few short
comings. The first is the ventilated pads. The cushions used in the Tomcat
do not have the ridges like most kits make, but are more flat. I filled the
cushions with Squadron Red Putty, and then sanded down a little, leaving some
indentations. Next, the line coming from the drogue chute to the guillotine (the
yellow piece on the left side of the seat) is not connected in the resin
seats.
Using a little stretched sprue, this was quickly remedied. Stretched sprue was
also added in various places on the seat to add the details of the various lines
on the seat, most notibly the "cut" lines on the back of the seat.
There are two yellow lines coming
from the back of each seat that, in the event of an emergency, fire crews can
cut those lines and will stop the sequence of the seats firing by
accident.
Next up were the harness straps. There are actually two risers coming from each
side of the parachute container, the lower will be a greyish color and the top
one has a olive cover around it. The pads have slots in them so that the risers
will come out of the
container and behind the pad, then come up. However, most Tomcats you'll see...
we never bother to tuck them under the pads, as the aircrews will pull them from
behind it when they strap in. The Koch fittings provided in the Teknics kit are
wrong. I ended up
making a single fitting from miliput, then making resin castings, and added
miliput SEAWARS (SEA Water Activated Release System) to the sides of them.
Some of the photo etched parts
did not fit correctly, and others were just plain missing, such as one of the
canopy frames for the "turtleback". The set included 2 of the same
piece instead, as was the case for a couple other parts. The fit of the canopy
to the
airframe was severly off and required a lot of sanding and grinding to get it to
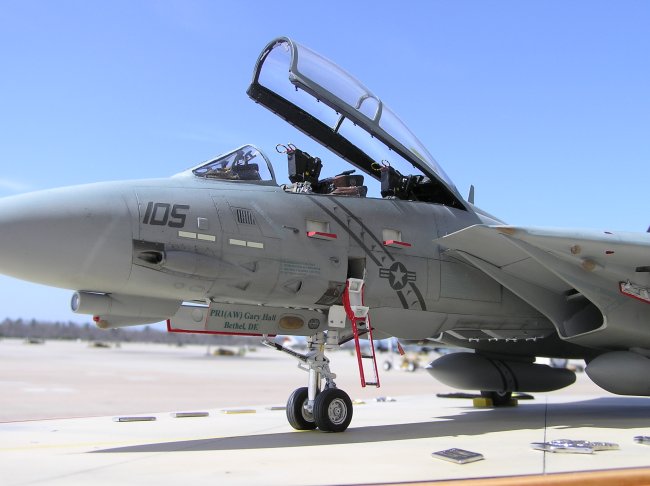
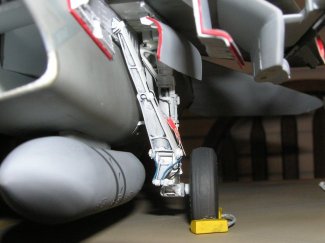
fit right. I added more stretched sprue to the landing gear for the brake and
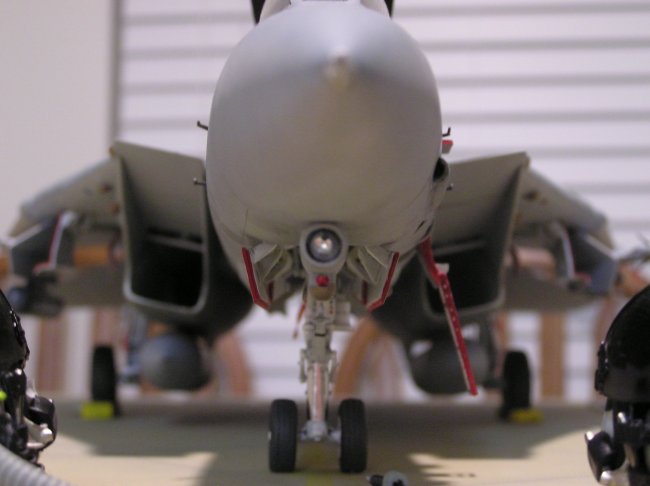
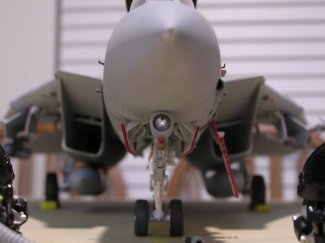
hydraulic lines. The TCS camera pod on the nose of the jet in the kit was simply
a piece of clear plastic
which they want you to paint silver on the back side.
If I'm going to have this many thorns in my side... I might as well add some
more, right? So I placed a MV lens, set back from the glass a few millimeters,
and painted the inside walls black to show the lens set back some as it should
be. There is also an MV lens for the landing light on the nose strut.
|
Click on
images below to see larger images
|
 |
 |
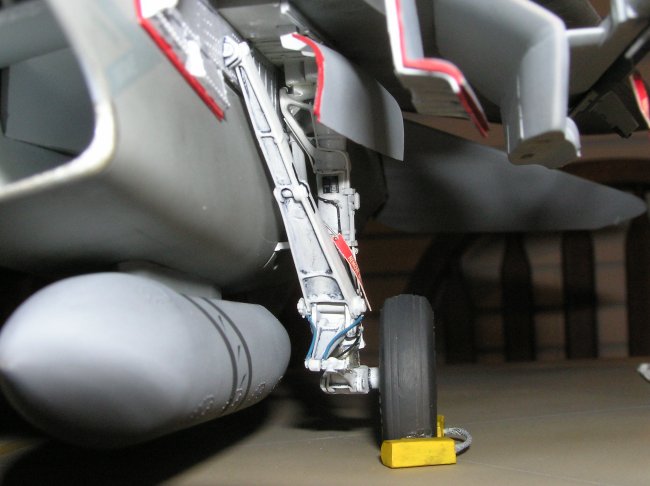
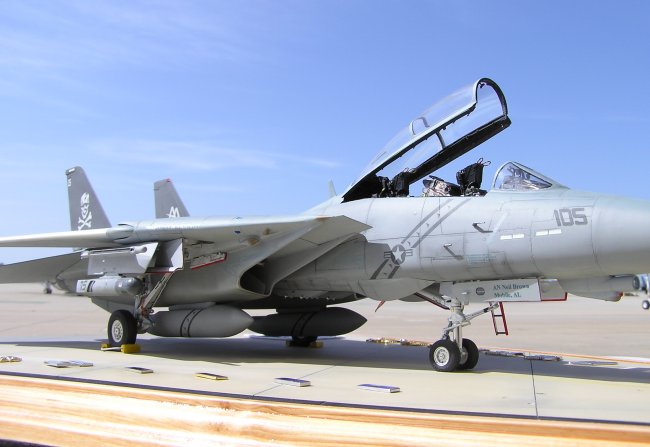
The Tamiya kit
also only provides you with rubber tires for the landing gear. Nice for...
uh.. something.. but not functional. Kinda hard to solid
mount a model to a base with rubber tires, so I assembled all the wheel
hubs and put the tires on, and then made molds and cast new ones from
resin. Doing this allowed me to drill holes in the main tires so I could
run a screw up through the base and screw her down, along with a smaller
hole in the nose gear to glue in a section of brass rod to bend under the
base
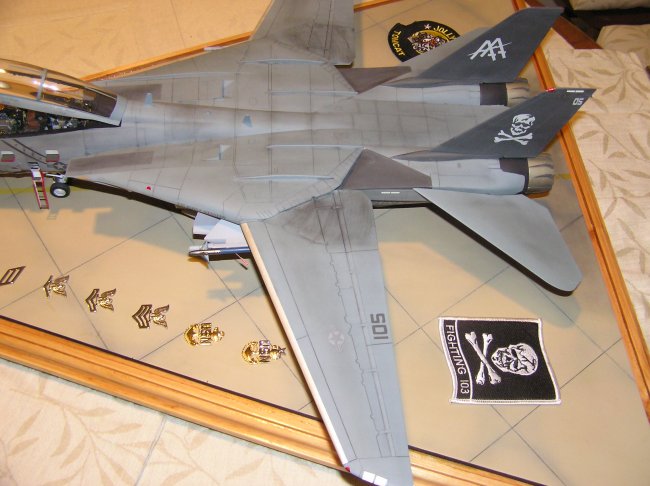
for stability. The last little bit of detail I added, which any Tomcat
modeler should do, was the streaks from the overwing fairings on the
wings. When the wings sweep, they pick up grease from the fairings and
leave streaks in an arc on the tops and bottoms of the wings. I simply
used a oil wash on an artist sponge brush, placed it to the fairing edge,
and swept the
wings. This gave me the proper arc, which I dusted over with pastel
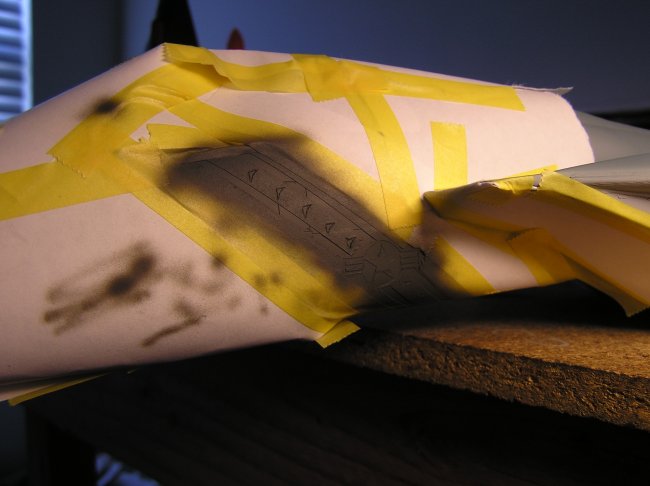
chalks. |
Click on
image below to see larger image
|
 |
|
She was finished using Testor MM
Acryl, Polly Scale and Tamiya acrylic paints, with a oil paint wash and pastel
chalks. The bones, Victory stripes, modex numbers, stars and bars, and the
"NAVY" were all painted on. The other decals were from CAM, Reheat,
and custom decals I printed at home. The names on the canopy rails are that of
my favorite aircrew I took care of during my time at VF-103, and of course... I
had to put myself on the port nose gear. The base is simply a sheet of
plexiglass that was cut, scored and painted like a tarmac. I chose to only load
her with a CATM-9 (training missile) and a LANTIRN pod, since that is normally
the only kind of load out you'd see
on the flight line.
All in all, an ok build. A very
big challenge to get accurate, but if it was easy, everyone would do it right?
Hopefully you enjoyed the pics and weren't to bored with my narrative. Time to
get to work on my next project: The 1/32 Revell MiG-29! 
Blair
|
|