|
Whilst surfing the 1:48 model kits
on eBay one weekend I spotted an incomplete Tamiya Avro Lancaster for sale -
just the wings, engines, props and tailplane - no fuselage or transparencies.
The possibility of making an Avro York sprung to
mind - all I needed to do was scratch build a York
fuselage; how difficult could that be?
I bid for the parts and won the auction. The easy part was over.
My plan was as follows:-
1. Carve a fuselage in balsa wood.
2. Skin this with plastic card and filler.
3. Cut off the front end just before the cockpit and use the balsa masters to
vac-form two halves in clear plastic.
4. Cut off the tail cone and use it to vac-form a plastic tailcone.
5. Scratch build a cockpit interior.
6. Graft the vac-formed bits onto the fuselage.
7. Use clear plastic to skin the glazed part of the fuselage (surface painted
black beneath).
8. Scribe fuselage panel lines.
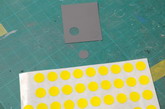
9. Use those self adhesive circles that you get in stationary stores to mask the
fuselage windows.
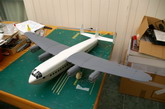
10. Make the wings etc. using the Tamiya parts.
11. Connect the wings etc. to the fuselage.
12. Mask and paint as per a normal kit (I will probably paint the wings and
fuselage separately).
13. Vac-form the central tail using another balsa master.
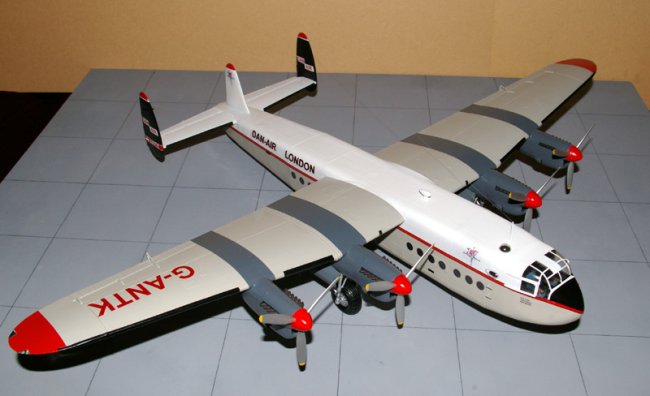
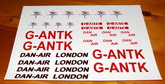
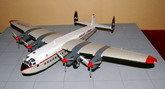
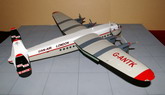
14. Make some home-made decals for the Dan Air York
G-ANTK.
15. Apply the decals and finish off.
16. Make myself a really a long drink and relax for a while.
Click on
images below to see larger images
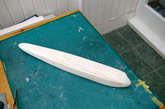
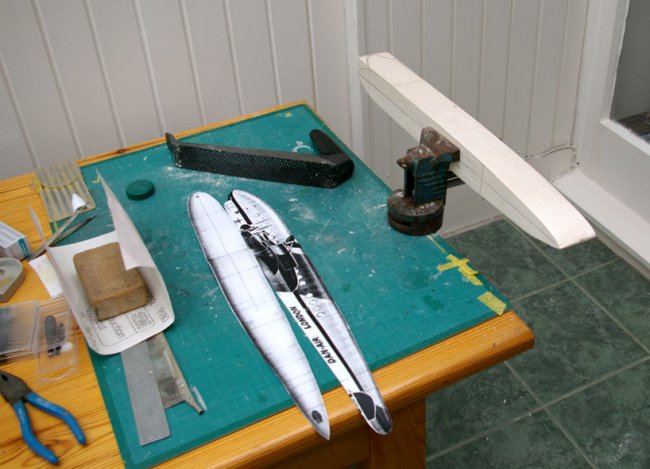
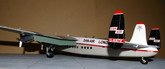
Step 1 was completed using a
surform to profile the solid balsa fuselage. I used enlarged plans from the
Profile Publications Avro York booklet as a guide
to mark the fuselage profiles on the balsa. It took a day to get the
balsa to shape and to "tweak" it in a few areas but using the
surform and a sanding block made "relatively" light work of it -
although my upper arms ached for about a day afterwards!!! I then jumped ahead
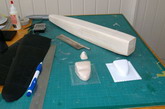
to step 15 and made the decals using my inkjet printer. Steps 3 and 4 were
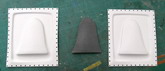
completed by cutting off the front end just behind the cockpit area using a
razor saw and spit it horizontally in order to vac-form the top in clear plastic
and the bottom in plain white. Before the vac-forming process I glued pieces of
2mm thick cardboard to the balsa masters to provide some oversail. This
gave me a margin to trim the parts to fit. I had considered splitting
the cockpit vertically but the main windscreen does not have a central pillar so
it had to be a horizontal split. I use a Mattell vac-forming machine to do the
necessary and it worked reasonably well. The tailcone was vac-formed in
one go.
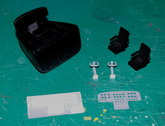
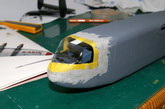
I made progress in the cockpit using photos
and drawings provided by fellow modellers Edgar and Miduppergunner. I
scratch built the seats and yokes and used the balsa vac-form masters for the
floor and front console as they strengthen the rather thin vac-formed outer
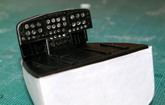
skins. I was going to cheat and use an Eduard zoom Lancaster instrument panel
but the York is much different - having both a
pilot and copilot. I therefore scratch built the panel in the same fashion as I
did for the Sanger Shackleton. Mike Grant's instrument decals made this a much
less daunting prospect.
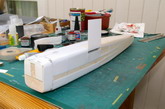
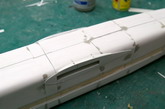
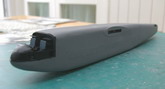
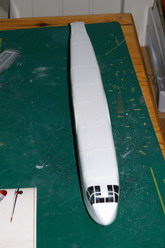
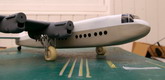
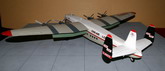
The balsa fuselage was
"skinned" with plastic card, the cockpit area was attached and the
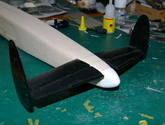
skinning joints filled. The central fin was carved from balsa and then port
and starboard halves vac-formed. Plastic card was also used to form the
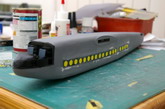
main wing and tailplane to fuselage attachment points. The main cabin
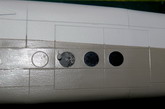
windows were fabricated from a strip of clear acetate with circular
self-adhesive labels of the correct diameter used to mask each
"porthole". The vac-formed cockpit glazing was attached with
cyano glue and the joints filled. sanded, re-filled, re-sanded etc.
until I was happy with the joint. There was a newar disaster when the
circular labels didn't want to come off. Fortunately applying whte
spirit broke down the adhesive without affecting the clear acetate beneath and
so the windows survived!!
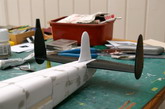
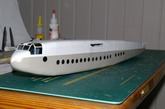
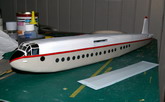
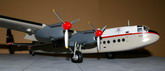
I surrendered to the aftermarket and
applied the Eduard Lancaster Flaps set to the Tamiya wings. These were
finally installed after much swearing and attaching of etched parts to fingers
with cyano glue. The red cheat line was masked and brush painted
with Humbrol enamel and the black borders were added courtesy of Xtradecal's
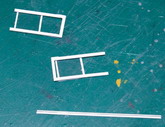
black decal stripes. I made the cockpit sliding side windows with angle
frames fabricated from plastic card and the sliding light from clear
acetate sheet. This was then glued to the cockpit side. I also added the
astrodome (spare vac-formed part from the Sanger Shackleton kit) and the
starboard side clear blister (from the Tamiya kit). The wings were
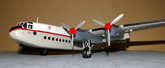
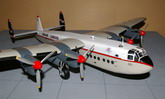
painted and then the home-made decals applied to complete the kit.
Piece of cake... :)
Darius
Click on
images below to see larger images
|