|
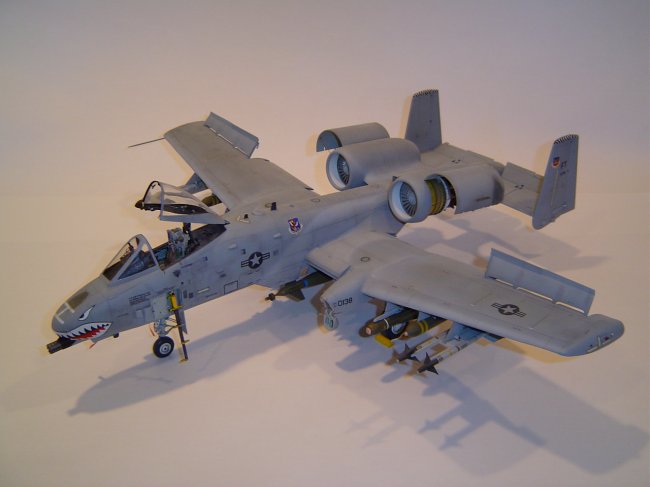
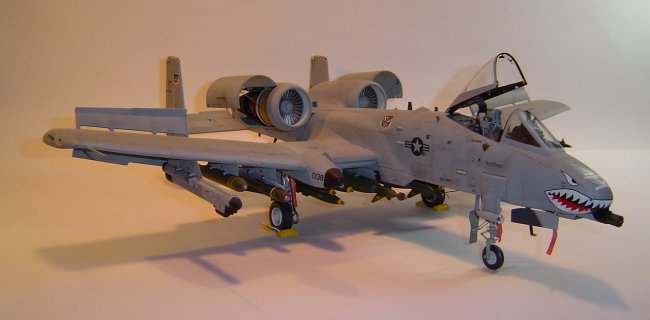
This is my
A-10A Warthog from Trumpeter. Much has been written about this kit, good
and bad, and I will not revisit it all in this article. I will say that
aftermarket kits are a MUST if you want to build an accurate, detailed kit.
And, since there are about 25-30 aftermarket sets to choose from, not including
decal sets, there are plenty of ways to build a top notch Warthog.
You should decide before you start whether you are building a pre- or post-LASTE
version (since it's obvious that Trumpeter couldn't decide), and buy
accordingly. Since I wanted to build a version as up-to-date as
possible, a decided on post-LASTE.
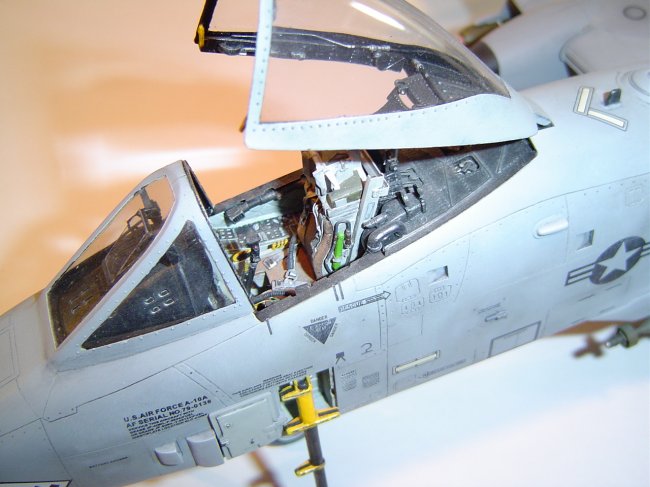
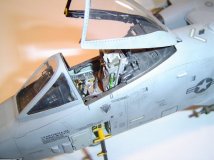
Starting with the
cockpit, I chose the Verlinden
kit because 1: the detail is exquisite, 2: the kit includes photo
etched parts, and 3: it was the only cockpit set the hobby store had in
stock. Seriously, I did my homework before I bought it (or so I thought)
and it seemed to be the right fit for me. I had never used photo etched
parts before, and a learning curve was definitely in order, particularly when
bending pieces. Fortunately, the learning curve parts are behind the
ejection seat and cannot be seen. The ACES ejection seat is gorgeous, and
I particularly like the seat belts that are cut from a thin sheet of lead.
They look very realistic. However, I did not enjoy threading the belts
through the tiny brass buckles, but after about 3 hours, I finally managed it.
The resin cockpit tub fits quite nicely into the kit with very little surgery
required.
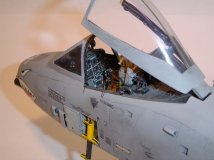
As I mentioned
earlier, I thought I had done my homework with the Verlinden set. However,
after investing about a month of work on the cockpit, I came to find
out that the Verlinden set was pre-LASTE. The most noticeable difference
is the air-conditioning ducts and vents running along the sides of the cockpit.
Since the cockpit tub was already glued into the fuselage when I discovered
this, I left them, rather than risk ruining an otherwise acceptable job with an
out-of-control Dremel Tool. So forgive me, all you Warthog purists, but I
kind of like the look of the AC ducts, anyway.
I added a few
additional details to the cockpit, using guitar strings for air hoses, and
strips of brass to create the two loops that hold a water bottle located behind
the pilot's left shoulder. The photo on the Verlinden set showed the
loops, but no mention of them was made in the instructions.
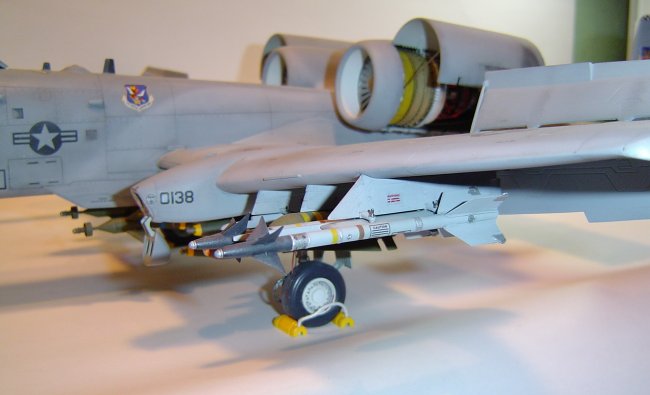
A very noticeable
flaw in the kit is the refueling receptacle door located on the front of the
port side landing gear bay. The kit has it set up so that the angle of the
door is completely vertical, instead of angled forward as on the real aircraft.
Cutting Edge has a resin set that
corrects this problem, but I chose to modify it myself by cutting and
repositioning the existing pieces. It isn't perfect, but it looks a lot
better.
|
Click on
images below to see larger images
|
|
|
 |

|
Construction of the
kit went fairly smoothly. The join between the engine pods and the
fuselage is a little hairy, and I had to recreate the nicely molded rivets in
that area after they were sanded off. The same is true underneath the
tail where the horizontal stabilizers join to the fuselage. The kit is
designed to have moveable control surfaces. I built my kit to take
advantage of this feature. In hindsight, I should have glued
them in one position, as I never move them.
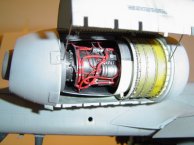
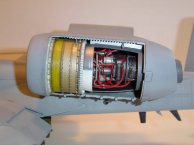
The kit comes with resin engines
that are designed to be displayed in clear plastic pieces, including clear fan
blades. I find this a really hokey way of doing this, so I painted the
clear pieces and cut out portions of the engine walls so the resin engines were
visible. I used wires from some old computer piece to simulate the pipes
and fittings in the engines. The port engine is fairly accurate as I had
some reference photos, but I made up the starboard side since I had no
reference. I've since found some photos of the starboard engine, and I'm
sad to say I wasn't close.
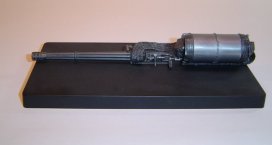
A nice feature of the kit is the
GAU-8 30mm Gatling Gun. Unfortunately, if built per the instructions, you
can't see any of it once the fuselage is glued together. Since the
Verlinden cockpit came with an extra muzzle (nice touch, by the way), I chose to
build the gun so it could be displayed outside, using the kit muzzle on the gun
and the resin muzzle on the aircraft. The ammo belts are made of window
screen material, as the kit belts were all wrong.
|
Click on
images below to see larger images
|
|
|
|
|
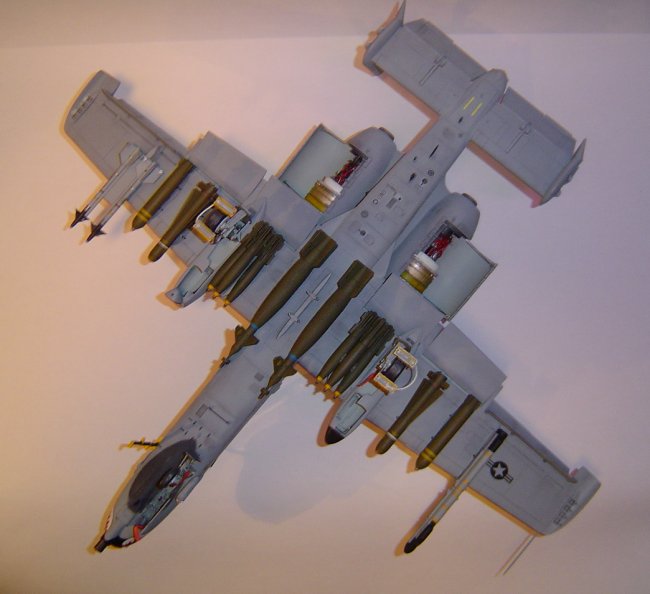
The armament I used is a
combination of kit parts and aftermarket kits. The kit armament is
dreadful; very outdated and inaccurate. The Sidewinders are from Cutting
Edge, and the GBU-10's and TER racks are from CAM.
The Snakeye 500 Lb bombs are leftover from my Tamiya F-14, and the balance of
armament is from the kit. This plane should really be carrying an ALQ-131
pod as opposed to the ALQ-119 pod, but that's all the kit provided. I
understand that Flightpath has a 1/32 scale ALQ-131 available, but I didn't feel
like shelling out any more money on this beast! Maybe someday I'll treat
myself.
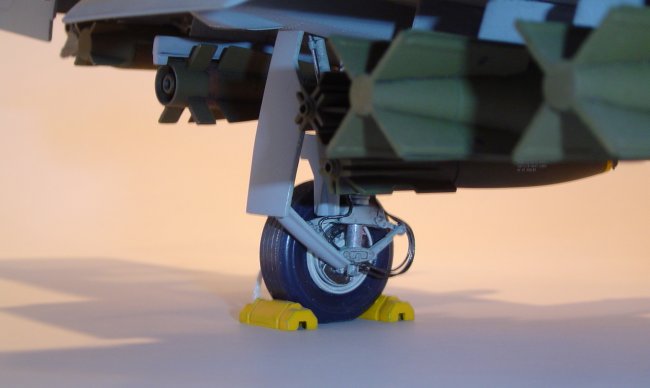
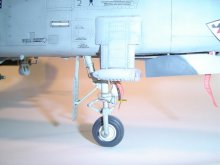
The kit landing gear struts are
white metal, which is a nice feature considering the weight of the plane.
However, my kit came with 2 right main struts instead of a left and right.
UGH! After several failed attempts of acquiring a replacement from the
hobby shop and Trumpeter, I had to perform surgery to fix the problem. In
addition, brake lines and electrical wires were recreated using guitar strings
and copper wire. Remove Before Flight tags are from my color printer.
I used MM enamels for the paint
job. Decals are a combination of Tiger Wing, Eagle Strike, and the kit
decals. The Tiger Wing and kit decals went on beautifully! No
silvering, and when they dried, looked like they were painted on. The
Eagle Strike decals were another story. They silvered horribly, and I
ended up redoing a large percentage of them. Some of them still look bad,
however. This particular plane depicts an A-10 based at Pope Air Base, and
these planes have seen action in both Afghanistan and Iraq. A wash of
black was applied, and the plane was given a fine coat of Polly-S Dust paint to
weather it a bit. A coat of DullCote was applied as the final step.
It took a total of
8 months and the first year's tuition of my son's college
education to complete, but it was worth it, as I have had great luck with
this model in several contests in the Massachusetts/New Hampshire area.
John
|
Click on
images below to see larger images
|
|

|
|

|
|
|