|
(Text in English
followed by the text in Spanish)
Hello fellow
modelers!
This is the first
article of a series related with some of my old and little 1/72 scale Airfix
models. These kits, identified by Airfix as Series 1, all featured a low
parts count, a clear stand, a basic cockpit, pilot figures (still among the best
in 1/72) to help fill the otherwise empty cockpit, incomplete and often
incorrect painting instructions, very old molds (some now have 40 years or more)
and the problems associated with them: inaccurate external shape with big rivets
or thick raised lines, thick clear parts, poor fit, sink marks, bent parts and
the like.
I guess that many
experienced modelers have built some Airfix kits in his or her life, in my case
I built several dozen when I was a teenager, more than 30 years ago, mainly
because these were at that time (and maybe they still are) the cheapest kits in
the market. Despite their small number of parts, these kits don't go easily
because one have to solve the fit problems, correct some of the shape issues,
and struggle with the decals. The construction of these kits is a challenge to
one's patience and capacity to withstand failures. On the positive side, some of
the Airfix kits subjects haven't been produced yet by another manufacturer.
I'll show only the
models that were airbrushed. The construction of these models span the last 14
years, approximately. All of them were built OOB, except for some minor
scratch-building.
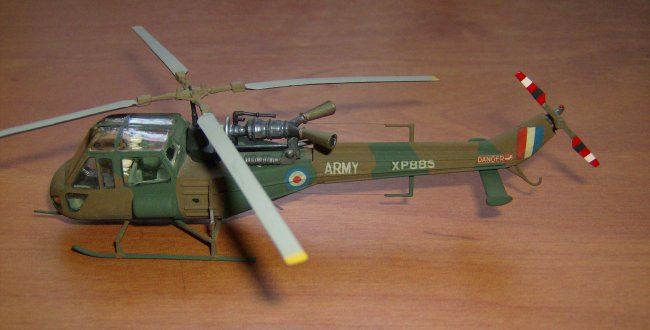
The Westland
Scout AH.1
I built two of these
little helicopters when I was a teenager, a British army version and a Jordanian
army version. The kit for the third built (the British army version again,
presented here) was bought perhaps more than 30 years ago, when Airfix sold
their series 1 kits in plastic bags with a folded written instructions sheet
attached (it contributed with another problem: broken parts, in this case one of
the main rotor hub's arms.) The instructions sheet had an instrument panel
printed, it was a feature common of older Airfix kits.
This built was the
second ever in which I used putty and an airbrush. After painting all the
cockpit pieces, the interior of the fuselage halves and the pilot figures, I
assembled the cockpit and glued the printed instrument panel over the console
with white glue. I used British interior grey-green (HU78) for the cockpit
interior and matt black for the console because I didn't have any specific
information. Then I glued the fuselage halves and attached the top clear part.
The joints that needed more putty were the front of the fuselage and the joint
of the top transparency to the bulkhead. After smoothing all the joints I added
the undercarriage skids and the tail horizontal stabilizer, the model now was
ready for painting (the engine and tail rotor assemblies were left for the final
assembly stage).
After masking all
the clear parts, I airbrushed HU29 Dark Earth overall, then airbrushed the HB1
Dark Green camouflage free hand. The model then received a coat of Humbrol Gloss
Cote and the decals were applied. It was particularly difficult to apply the ID
codes to the ribbed tail boom, these old decals cracked and I had to remove part
of them, fortunately it's hard to notice on the finished kit. I then assembled
and airbrushed the engine, the main rotor and the tail rotor following the kit's
instructions.
Click on
images below to see larger images
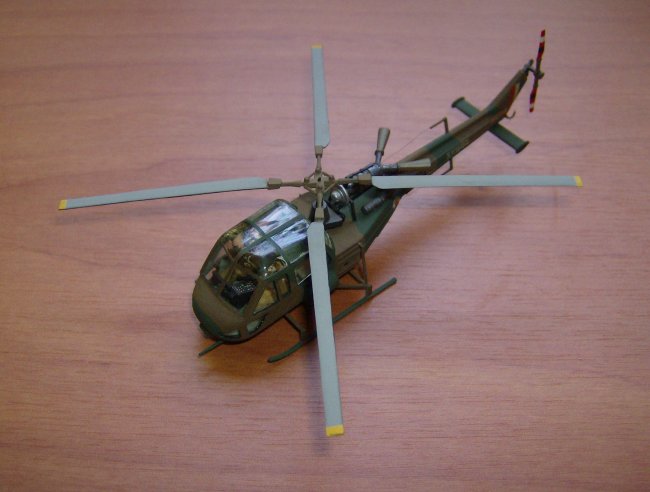
After the model was finished I found in
some photographs (Internet wasn't as available as it is nowadays) that the color demarcation should be hard, therefore I hand-brushed
the dark green again (I didn't want to mask over the decals.) Later, in 1996, I
had the opportunity of visiting the RAF and RN helicopter museum at Yeovilton,
there I took some pictures of a Westlang Wasp (the naval version of the Scout).
These pictures allowed me to improve my model a little: I tinted the front-top part of the canopy with Humbrol
Clear Smoke and painted the engine with five different
metallic colors (the instructions sheet suggested black overall.) Some time later I broke and lost the tip
of the tail skid in an accident in one of my frequent "model dust-cleaning
sessions," so I replaced it with copper wire. Therefore this model was the
first in which I did some scratch-building. The model was finished thirteen
years ago, so I polished the clear parts with Model Wax before taking the
pictures shown here.
Well, after all
these years I can't deny that those old Airfix kits have helped me a lot in the
development of my building and finishing skills. In addition, many of them came
with written instructions (the graphics-only instructions were invented later,)
this fact helped me a lot with my english-language reading skills. Now, when I
find some of the same problems in newer -and more expensive- kits, I feel
confident that I will solve the problems more easily, thanks to the experience I
gained with those old (and sometimes odd) kits.
Greetings from
Caracas, Venezuela.
Orlando Sucre
Rosales
Photos and text ©
by Orlando Sucre Rosales
¡Hola, compañeros
modelistas!
Este es el primer
artículo de una serie relacionada con algunos de mis viejos y pequeños modelos
Airfix en escala 1/72. Esos modelos, identificados como Series 1, tenían
pocas piezas, un soporte transparente, una cabina muy básica, figuras de
pilotos (todavía entre las mejores en 1/72), instrucciones de pintado
incompletas y a menudo incorrectas, moldes muy viejos (algunos ahora tienen 40 años
o más) y los problemas asociados con ellos: forma externa incorrecta, con
grandes remaches o líneas gruesas en alto relieve, transparencias gruesas,
ajuste pobre, marcas de hundimientos, partes dobladas y así por el estilo.
Supongo que muchos
modelistas experimentados han armado algunos modelos Airfix en su vida, en mi
caso construí varias docenas cuando era adolescente, hace más de 30 años,
principalmente debido a que eran en esa época (y tal vez sigan siendo) los
modelos más baratos del mercado. A pesar de su reducido número de piezas,
estos modelos no se arman fácil porque uno tiene que resolver los problemas de
ajuste, corregir algunos detalles y lidiar con las calcomanías. La construcción
de esos modelos es un reto para la paciencia y la capacidad de soportar fracasos.
Del lado positivo, algunos de los temas de los modelos de Airfix aún no han
sido producidos por otro fabricante.
Sólo mostraré los
modelos que fueron pintados a aerógrafo. La construcción de los mismos abarca
los últimos 14 años, aproximadamente. Todos fueron construidos originales del
empaque, excepto por algunas piezas.
El Westland Scout
AH.1
Yo hice dos de estos
pequeños helicópteros cuando era adolescente, uno del ejército británico y
otro del ejército de Jordania. El modelo presentado aquí fue adquirido hace más
de 30 años, cuando Airfix vendía sus modelos Series 1 en bolsas plásticas
con la hoja de instrucciones doblada y engrapada (esto contribuyó con otro
problema: piezas rotas, en este caso uno de los brazos de la pieza central del
rotor principal). La hoja de instrucciones traía un panel de instrumentos
impreso, esto era una característica común de los modelos Airfix más viejos.
En este modelo fue
la segunda vez que usé masilla y aerógrafo. Después de pintar todas las
piezas de la cabina, el interior de las mitades del fuselaje y los pilotos,
ensamblé la cabina y pegué el panel de instrumentos impreso sobre la consola,
usando pega blanca. Pinté el interior de la cabina con verde grisáceo interior
británico (HU78) y la consola con negro mate, porque no tenía ninguna
información específica. Luego pegué las mitades del fuselaje y la
transparencia superior. Las uniones que necesitaron más masilla fueron la del
frente del fuselaje y la de la transparencia superior con la mampara
trasera de la cabina. Después de suavizar todas las uniones agregué los
patines de aterrizaje y el estabilizador horizontal de cola, en este punto el
modelo estaba listo para pintarse (el ensamblaje del motor y del rotor de cola
fue dejado para la etapa de ensamblado final).
Después de
enmascarar todas las transparencias, pinté todo el modelo con Tierra oscura
HU29 aplicado con aerógrafo, luego pinté el camuflaje con Verde oscuro HB1,
aplicado con aerógrafo a mano alzada. El modelo después recibió una capa de
Gloss cote de Humbrol y se aplicaron las calcomanías. Fue particularmente difícil
aplicar los códigos de identificación sobre las costillas del botalón de
cola, por lo viejas estas calcomanías se agrietaron y tuve que quitar parte de
ellas, afortunadamente es difícil de apreciar en el modelo terminado. Luego
ensamblé y pinté con el aerógrafo el motor, el rotor principal y el rotor de
cola siguiendo las instrucciones del modelo.
Después que el
modelo estuvo terminado encontré en algunas fotografías (la Internet no estaba
tan disponible como hoy en día) que la demarcación entre los colores debería
ser aprupta, por lo que pinté nuevamente el verde oscuro, esta vez con pincel
(no quería enmascarar sobre las calcomanías). Después, en 1996, tuve la
oportunidad de visitar el museo de helicópteros de la RAF y de la RN en
Yeovilton, allí tomé algunas fotos de un Westland Wasp (la versión naval del
Scout). Esas fotos me permitieron mejorar un poco mi modelo: oscurecí la parte
superior delantera de la carlinga con Humbrol Clear Smoke, y pinté el motor con
cinco colores metálicos distintos (la hoja de instrucciones sugería todo en
negro). Tiempo después rompí y perdí la punta del patín de cola en un
accidente en una de mis frecuentes "sesiones de limpieza de polvo de
modelos", por lo que la reemplacé con alambre de cobre. Este fue entonces
el primer modelo en el que agregué piezas construídas por mí mismo. El modelo
fue terminado hace trece años, por lo que pulí las transparencias con Model
Wax antes de tomar las fotos mostradas aquí.
Bueno, después de
todos estos años no puedo negar que aquellos viejos modelos de Airfix me
ayudaron en el desarrollo de mis destrezas de ensamblado y acabado. Además,
muchos de ellos vinieron con instrucciones escritas (las instrucciones con sólo
gráficos fueron inventadas después), este hecho me ayudó mucho con mis
destrezas de lectura del inglés. Ahora, cuando encuentro algunos de los mismos
problemas en modelos más nuevos -y más costosos- tengo confianza en que los
resolveré más fácilmente, gracias a la experiencia que adquirí con aquellos
viejos (y a veces singulares) modelos.
Saludos desde
Caracas, Venezuela.
Orlando Sucre Rosales
|
|