|
Gotha
Go242A-1 assault/cargo glider 1. Components
Italeri 1:72 kit
Eduard Luftwaffe seat belts
Airwaves seat
Superscale swastikas
Frog Starthilfe packs
Falcon Clearvax canopy set 42: Luftwaffe Part 7
Reheat generic instrument decals
Eduard Luftwaffe rudder pedals
2. Fuselage: Initial preparation
The kit comes with a cabin floor, and flight deck, with the secondary structure moulded onto the internal side walls. Although no complete aircraft survive, the skeletal remains of at least two exist, and are well documented online. It was thus not difficult to determine the layout of the primary structure. The structural layout followed the typical German plan of fabric and metal frames over a primary structure of metal tube. The spars pass through the cabin, and are visible from the interior. First, the ejector marks on the inner fuselage walls were filled, and the detail produced over them with Mr. Surfacer. The embrasures for the window panels were also filled, taking care to keep the windows proper clear.
The layout of the interior structure was sketched in plan, underplan, and port and starboard side views, then each individual piece was cut from plastic rod and glued into the inside of the fuselage. The control run running along the starboard upper fuselage roof was added from scrap plastic and Milliput. The aft spar was crafted from scrap balsa. The padding on the cabin ceiling was added with Milliput. The structure of the cabin roof was attached to the starboard fuselage half, and carefully checked for fit.
The entire aft end of the fuselage nacelle formed the main cargo door, which was moulded separately. The interior was treated in the same way as the main fuselage, with the slatted central floor made from scrap plastic. The cabin side doors are separately moulded, with the same interior as the main fuselage, I kept one separate and attached the other to the fuselage - the fit is good.
The kit door attachment arms appear solid enough, but do not represent the actual arrangement at all, being designed instead purely from a model engineering point of view. I built the doorframe from plastic scrap, with slots for the travel of the actuators, which I cut from brass rod, for strength.
3. Interior
The kit includes the basic cabin floor. I painted it a dark brown, washed with brown and black ink, so as to represent unpainted wood. The kit contains ramps for loading vehicles (but not the Kubelwagen in this issue), so I opted to have it fitted out for carrying vehicles not personnel - i.e. no bench seats.
The bulk interior was painted in RLM02, and then shaded with a wash of black ink, as was the inside of the cargo door. The aft fuselage interior was left until the fuselage halves were mated, however.
4. Flight deck
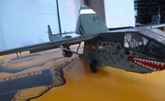
The flight deck as kitted is reasonably accurate, but the throttle quadrant (the kit has an option for the powered Go244) has to be removed. The port seat, modelled in the kit as a plain canvas seat was in fact a full-back seat such as those seen in powered aircraft. I replaced it with an item from the Airwaves Luftwaffe Seats set. Both were fitted with Eduard seatbelts. On the copilot's side of the cockpit, I added the RATO control panel. The small instrument panel was attached to the inside of the Falcon replacement canopy, as were a couple of handles, and the blinds, formed of pieces of red Rizla cigarette papers. There is an armour plate ahead of the pilots, which was carved from scrap plastic, with plastic rod representing the strut. The Eduard rudder pedals were attached in place, and a trim wheel from the spares box added to the pilot's console. The control column was installed from the kit.
The flight deck interior was painted in RLM66, as were the seats, whose belts were picked out in white. The instrument panel was painted in RLM66, and suitable instruments from the Reheat decal sheet then applied. Unfortunately, I did not notice that these need to be applied over a white background in order for the markings to show properly, so they did not stand out in the manner that they should have done. The handles of the control column were painted in Humbrol 9 Tan.
The flight deck glazing is naturally rather unstable given the size of the vacform. A hole was punched in the lower front to make the missing towrope attachment point, backed with a length of plastic tube. The interior frames were painted in RLM66 after the pieces were dipped in Humbrol Clear. The Falcon set also contains a replacement for the glazed tailcone, which is slightly more accurate than the kit version. This was handled in a similar manner.
|
Click on
images below to see larger images
|
|
|
5. Fuselage Sealing
This stage was performed after the bulk of the assembly was done. The window panels were dipped in Clear before the individual panes were cut from the panels and fitted into the fuselage window apertures. The curved contours of the cargo door meant that the panels wouldn't remotely fit flush, and they were replaced by Clearfix. The port access door was temporarily attached with PVA, as was the cargo door.
6. Wings
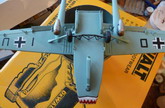
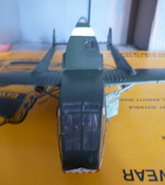
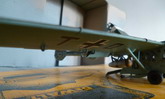
The wing comes conventionally divided into port and starboard upper and lower halves. The upper half includes the flaps, which were carefully sawn off in order to mount them at a more realistic angle. Before the wing halves were bonded together, the panel lines were engraved and the original raised lines sanded off. Although the four dorsal and ventral stiffeners at the wing root are present on the kit, they are very muted, and were replaced by lengths of plastic strip. When the wings were attached to the fuselage, their tabs cut back to clear the internal structure, lengths of plastic strip were wrapped around the roots in order to represent the external structure. The separate fairings (replaced by engine nacelles for the 244) for the tailbooms fitted just fine. The underwing struts were equally straightforward to install.
7. Empennage
The tailbooms come in two halves, with a monolithic tailplane in between. The rudders are separate. The upper edge was a little rounded, compared to photographs, so it was built up with Milliput. The tail booms were glued to the wings - which required the most filler anywhere on the kit, but still not an excessive amount, before the tailplane was attached between them. The separate rudders were left for later, then attached in a deflected position similar to that shown in photos.
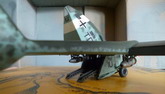
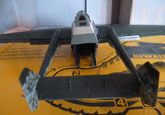
8. Undercarriage
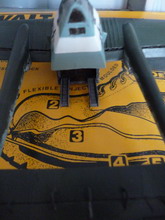
The undercarriage for the A (the kit also contains parts for the proper wheeled undercarriage of the B) consists of three skids, with a droppable dolly for ground handling. The latter consists of two relatively well moulded pieces, in addition to the wheels. The former each come in two halves, but need some work - the outline is accurate, but the main skids are heavily simplified, with the wheels modelled as slotting into the aft ends, when in fact the axles were mounted behind the skids on projecting plates, with a shock absorber between them and the fuselage. One of the kit wheels fell victim to the carpet monster, and had to be replaced by a suitably sanded piece of plastic rod. A tie was added to the hooked aft end of the nose skid.
The dolly wheels were flattened with a steam iron, and painted, the hubs being black and the tyres Xtracolour Tyre Black. The assembled dolly was painted in RLM02, and washed with a mixture of brown and black ink.
9. Final assemblies
The kit includes a full set of furniture for the wings, and most of what is needed for the empennage. The mass balances and flap hinges were added to the underside of the wing, the latter cut to accommodate the deflected flaps. The kit contains mass balances for the rudders, but the external cables had to be added from fuse wire. The mass balances for the elevator were added from plastic scrap and rod. Fuse wire was used to make the external MG15 mount, above the copilot's station, and plastic rod was used to make the pitot probe on the port side of the cockpit. A vent was added to the port side of the nose from scrap plastic and filler. The kit also includes entrance steps, which were fitted beneath the cabin doors. These had handles made for them from bent plastic rod.
The Starthilfe packs came from the old Frog Arado Ar234 (to be reborn as the V16). The old paint job was stripped off, and the solid material cut from in between the mounting frames, the gap in the upper body being filled with Milliput. The nozzles were opened out with a drill and panel lines scribed into the bodies. These were painted in Metalcote Matt Aluminium, and the parachute packs in Humbrol 62 Leather Brown, shaded with brown ink. The mounting struts were painted in RLM02, and washed with brown and black ink. The fuel markers were painted in Humbrol 34 Matt White as a background, the Z-Stoff markers being painted in Humbrol 14 French Blue, and the C-Stoff ones in Humbrol 24 Trainer Yellow.
10. Painting
The model was extensively masked with a mixture of Micro Mask and Tamiya masking tape. This proved quite challenging on the canopy, as one had to press quite hard to get the tape to adhere, the canopy deflecting quite enthusiastically.
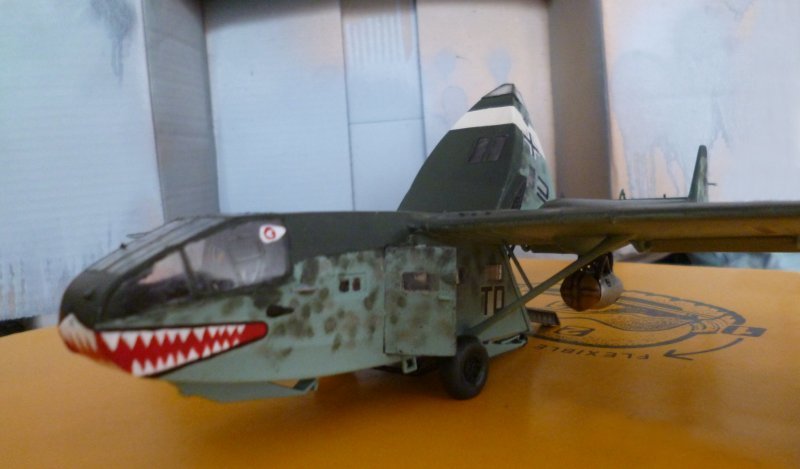
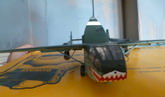
The option for the A-1 in the kit is TD + IU, of an indeterminate LTG. It isn't clear whether this unit is stationed on the Eastern Front, (in which case the tail band would be yellow) or in the Mediterranean theatre (in which case it would be white). Several photographs of this aircraft, with its distinctive sharkmouth are available - all monochrome, so the exact colour scheme retains an element of guesswork. After priming with acrylic grey primer, and preshading the joints with matt black, the upper surfaces were painted in a splinter pattern of RLM70 and 71 whilst the sides and ventral surfaces were painted in RLM65. The sides featured an extensive mottle of RLM02 and RLM71. Applying this to the inner sides of the tailbooms proved particularly tricky, as the span is shorter than the airbrush. Humbrol acrylic was used for the RLM65, although I now suspect this to be too blue. The remainder of paint scheme was executed with Xtraacrylix. Some issues with overspray were encountered, and more with clogging of the fast-drying acrylic in the airbrushes. I had to be ready with thinner and cottonbud to deal with overenthusiastically applied mottle, too.
The theatre marking band on the cargo door was painted in Humbrol 34 Matt White, Once completed, the model was given a coat of Clear in preparation for the decals.
11. Markings
The kit contains Balkenkreuzer for the six positions, with the A option featuring Stammkennzeichen and a three-piece decal for the sharkmouth. Two small eyes are included, but these are wholly inaccurate. As usual, there are no Hakenkreuzer, and the one applied to this aircraft was an unusual size. But a sheet issued with Scale Aircraft Modelling had the necessary.
The sharkmouth is inaccurate, both in number and shape of teeth. It further lacks the black border seen on the actual machine. Fortunately, enough photographs exist for the correct version to be fully visible. It is interesting that the most well attested marking should be fumbled. And it's not just this kit either - the 1/200 and 1/144 representations also seem to have it wrong. The decals were applied and then overpainted with Miniatures Paints Bright Red and White, which fortuitously happened to be good matches for the original, until the correct version of the marking was achieved. The black border was added with acrylic black, as were the two 'nostril' markings beneath the aft end of the canopy. After painting and varnishing were completed, the two eyes on the aft sides of the canopy were painted on in the same three colours.
By the looks of a photo, there seemed to be no Balkenkreuzer on the dorsal wing surfaces, so these were left off. Once the decals were dry Xtraacrylix matt varnish was sprayed on to complete the finish. Afterwards, the rudder cables were picked out in Humbrol 56 Aluminium, and the pitot probe in Humbrol 11 Silver, as were the door handles.
12. Final Assembly
The cargo and port cabin door were removed with a scalpel. The Starthilfe packs were then attached to what seems to be the most logical place, beneath the tailboom roots (photographic evidence is vague). I did forget to include the parachute release cables, unfortunately.
The main skid wheels were painted in Xtracolour Tyre Black, and then skids were attached with high-viscosity cyanoacrylate to the fuselage underside. Only the nose skid has a locating hole. The root of the nose skid was painted in Humbrol Matt Black in order to simulate the shock absorber. The assembled dolly was then attached in a similar way, just behind the cabin doors. The model then had the correct sit, resting on the aft end of the skids.
The flaps, one pair inboard and one outboard of the tailbooms were then fitted, being set in place with high viscosity cyanoacrylate. The cargo bay door was fitted, being glued in place with high viscosity cyanoacrylate, the brass stay being attached with epoxy resin. The port door was attached in with medium viscosity cyanoacrylate, as were the two vehicle loading troughs.
Overall, despite the kit's fairly advanced age, it is a good option. The assembly is as headache-free as can be expected from the configuration, and the kit exhibits the solid engineering which has long been associated with Italeri. There are few inaccuracies, so far as I can determine, and these are easily dealt with. All this is fortunate, as it seems to be the only 1/72 kit of this significant family of aircraft ever made, for all that it is over forty years old.
13. References
Internet resources:
Gavin Parnaby
|
Click on
images below to see larger images
|
|
|
|