|
In common with the
great majority of their products, especially those in 1/72, the Esci A-7D kit is
extremely nice, being nicely moulded with fine recessed panel lines, a decent
level of detail & thin, well-moulded clear parts. Nothing's perfect
however and the kit has 3 main problems - the standard Esci problem of
inadequate cockpit detail with decals for the panel and side consoles and two
problems specific to the kit, namely a total lack of intake trunking, with the
intake blocked off just behind the intake lip, and an equally total lack of
nosewheel bay, just a hole in the fuselage with a shelf to locate the nosewheel.
Fortunately, help is at hand - when they reissued the kit, Italeri modified the
tooling to incorporate a nosewheel bay and an intake blank. A friend sent
me a spare intake blank (thanks Mark), which I gave to my fiancée, who's
building the same kit, and a copy of the instructions for the Italeri version
and I then made a phone call to The Hobby Company, the Italeri importers in the
UK, who were happy to sell me another intake blank, a replacement for a missing
intake piece & the Italeri decals. Once all
this was sorted, I was finally ready to make a start.
Having no desire to start scratchbuilding cockpit detail, I simply painted up
the cockpit bath & applied the decals as supplied. The ejection seat
was beyond redemption though, so I planned to replace it with a Neomega resin
item later in the build. At this point, the lack of intake trunking proved
a distinct advantage - unlike most A-7 kits, there's absolutely masses of room
for noseweight, so I just superglued in place a good chunk of lead , actually an
old cast lead .45 calibre bullet . The rest of the
basic airframe went together pretty painlessly , requiring just a couple of
fill/sand/prime cycles, and it was into the paintshop.
First off, I sprayed the gear wells & the inside of the gear doors in
Halfords gloss white, having previously removed the location pegs from the doors
so that I could fix the gear doors into the wells using Blu Tak.
However, it soon became apparent that the gear doors were actually too big the
fit into the wells in the closed position so I had to mask the wells with tape
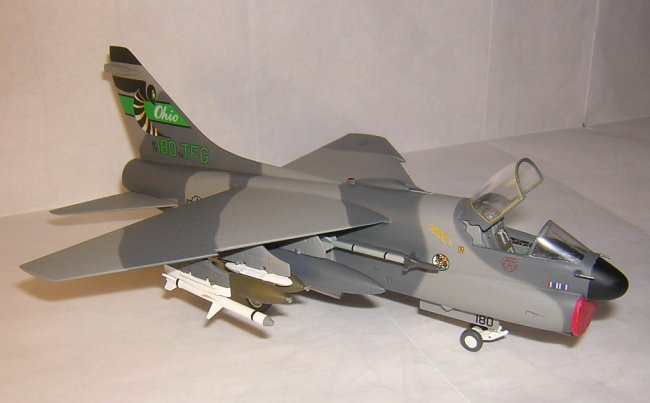
& Blu Tak & then hand paint the doors. I'd chosen to build the
Ohio ANG bird finished in the 36270/36118 scheme, so sprayed an overall coat of
Humbrol 126 & then set out to mask up for the darker grey.
Fortunately, I realized soon after I started that the camo pattern on the
Italeri instructions is just plain wrong as they've merely copied the pattern
from the grey/green birds & this totally failed to tally with photos I'd
seen of the grey aircraft in Rene Francillon's ANG book. Consequently, I
dug out the appropriate issue of Scale Aircraft Modelling & found the camo
pattern shown in the "Aircraft in Detail" article seemed a decent
match for the various pics. Strangely, however , it showed a wraparound
pattern on the fuselage, but the underside of the wings in plain 36270. It
wasn't that easy to tell, but in the end I found a pic in the ANG book where it
could be seen reasonably clearly that there was indeed a camo pattern under the
wings. Not having any details of this pattern, I simply masked up as
a mirror image of the upper surface pattern, which may not be accurate, but
certainly looks ok & then sprayed Humbrol 125 to finish off the camo.
Once the main camo was painted, it was pretty much all plain sailing. I
glossed up the paintwork, applied the Italeri decals, which were thin, nicely
printed & went on flawlessly, then painted & fitted the various detail
parts & the stores, which were a mix of kit items (droptanks, Shrikes &
Shrike adaptors) & Hasegawa weapons sets (Sidewinders, TERs & cluster
bombs. A final coat of Humbrol Mattcote & it was time to demask the
windscreen, wipe it over with WD-40 on a cotton bud (Q-tip to those of you in
the States) & touch up the inevitable paint chipping round the edges of the
masking. Once this was completed, I attempted to fit the control column
& ejection seat. Both turned out to be too big, the stick being so
tall it was level with the top of the instrument panel & the seat sticking
out well above the canopy line, so I cut down the stick & attacked the base
of the seat with an engineer's file until everything fitted, then fixed the
canopy in place as a final step.
Whilst the foregoing sounds like a real catalogue of problems, nothing was too
difficult to resolve & the end result was a model with which I'm very
pleased.
John
|
|