|
Hello everybody!
As promised I'm here with my
second submission on ARC.
First of all, I must take a few seconds to
thank all of you who saw the first article and cared to contact me with
words of appreciation and encouragement. It's really great to have people
with 25+ years of modelling under the belt supporting me and giving me
motivation to better my modelling talents. So again, I THANK EVERY AND
EACH ONE OF YOU!
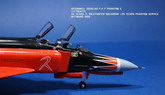
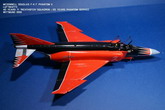
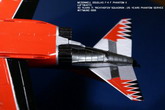
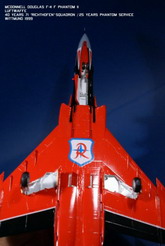
On to the model, this was my first Phantom
and I choose a F-4 F from the German Air Force in quite striking colours,
which commemorates 40 years of the "Richthofen" squadron and 25
years of Phantom service back at Wittmund in 1999 where it gave a solo
performance.
As I opened the box, by the kit's fault or
my own, I knew this would be a challenging build: over 100 pieces
with rather complex sub-assemblies laid over 38 steps on the instruction
sheet!
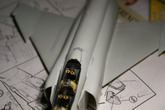
And right I was. As you can see in the
photos the fit took much sanding and filling, mainly in the intakes, lower
fuselage and front wheel bay. Note also that one of the fuselage halves
was some millimeters longer than the other resulting in more hard work.
The wings, on the other hand, fit very well.
After blending it all together, relieved the
worse part was over, I was ready to go splash some paint!
Click on
images below to see larger images
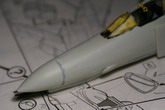
First I primed the model, and went to an
enjoyable simple masking...I'm sorry, did I say enjoyable? What about
those little edges on the lower fuselage around the front
wheel bay to get the right demarcation lines? And those very
aggressive
looking intake split plates, Lovely aren't they?
After the Black/Red "camo" was
done, I turned my attention to the metalized parts. I used gun metal
and aluminium and tried a different approach in the exhaust nozzles.
This
was not my idea, to each his own, I read it in "Model Aircraft
Montlhy" in a very well done Israeli Phantom. In order do capture
that "bluish" burned texture, I painted the nozzles gloss
black with a clear blue coat brushed over them followed by dry-brush in
alluminium. I think I over did the dry-brushing though, which cuts
back the effect a little.
I used the Kit's decals and again faced a
new "labour", I was starting to feel like Hercules by now:
Both the nose decal an those white demarcation lines that separate black
from red in the wings had to be cut in different peaces and then patched
up together using Humbrol decalfix. The rest of them went on fine.
I passed up on weathering since this was a
"one time show" flight in a supposedly fresh painted aircraft.
In spite of all the hardships, I am
reasonably satisfied with the result specially because it's a great looking
aircraft in such a good looking paint scheme, but also because it gave me the opportunity
to evolve my work.
Well, I'm moving on to the next
build, and will report it to you in time.
Best for everyone!
JGV
Click on
images below to see larger images
|